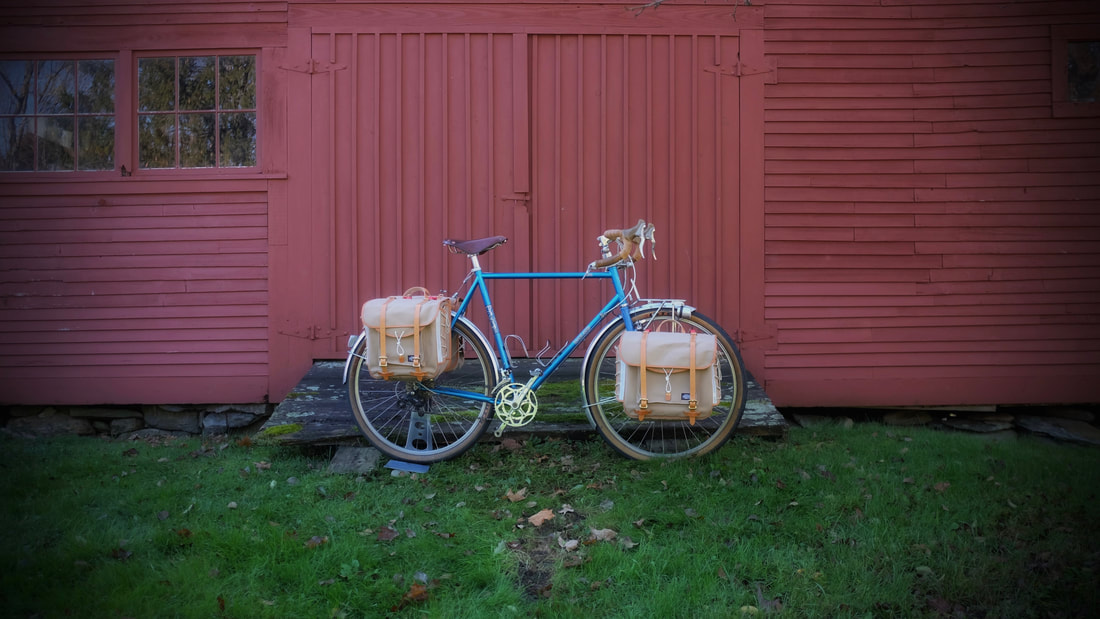
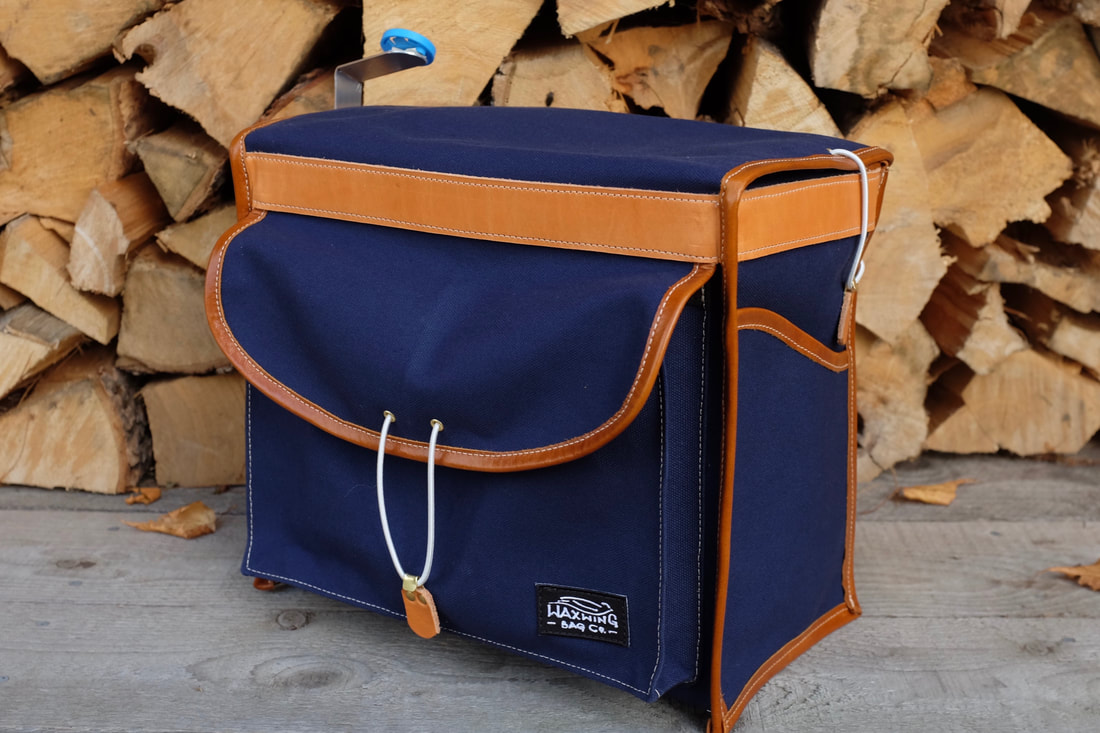
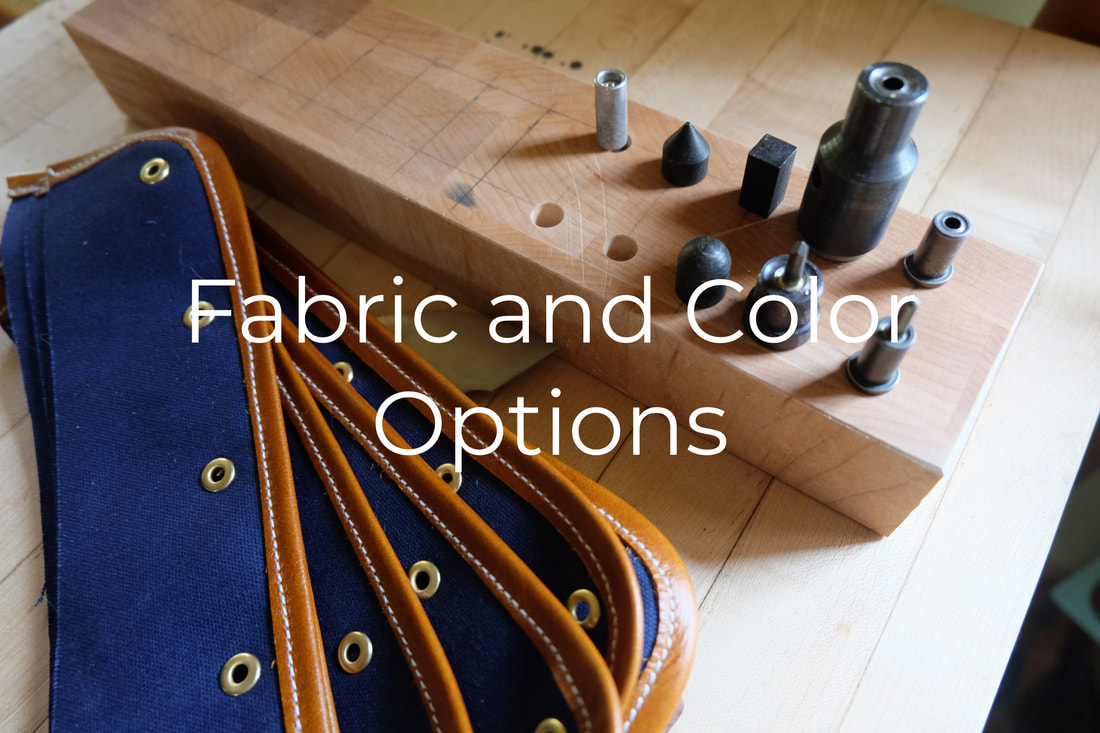
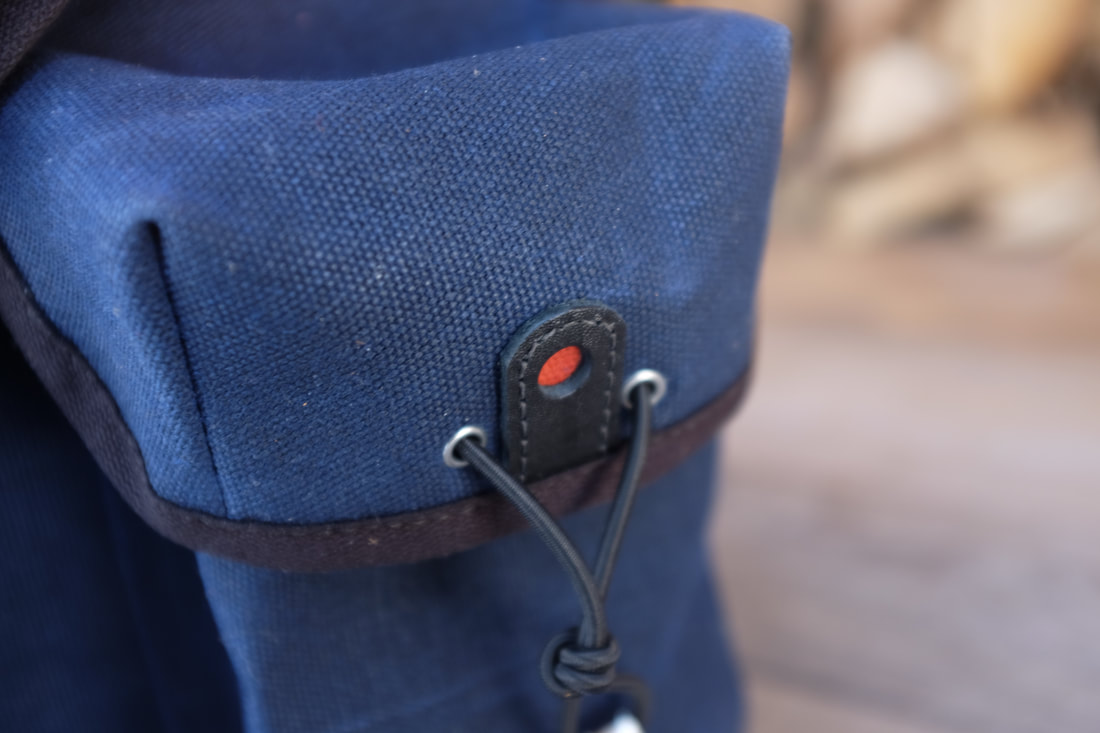
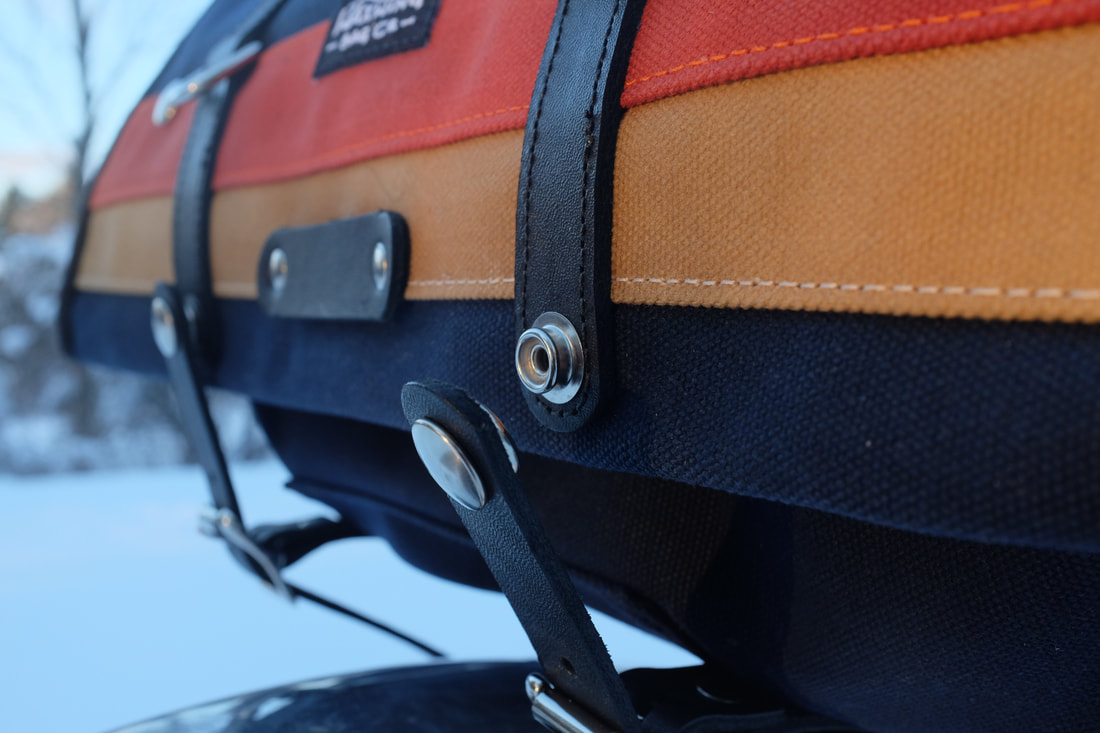
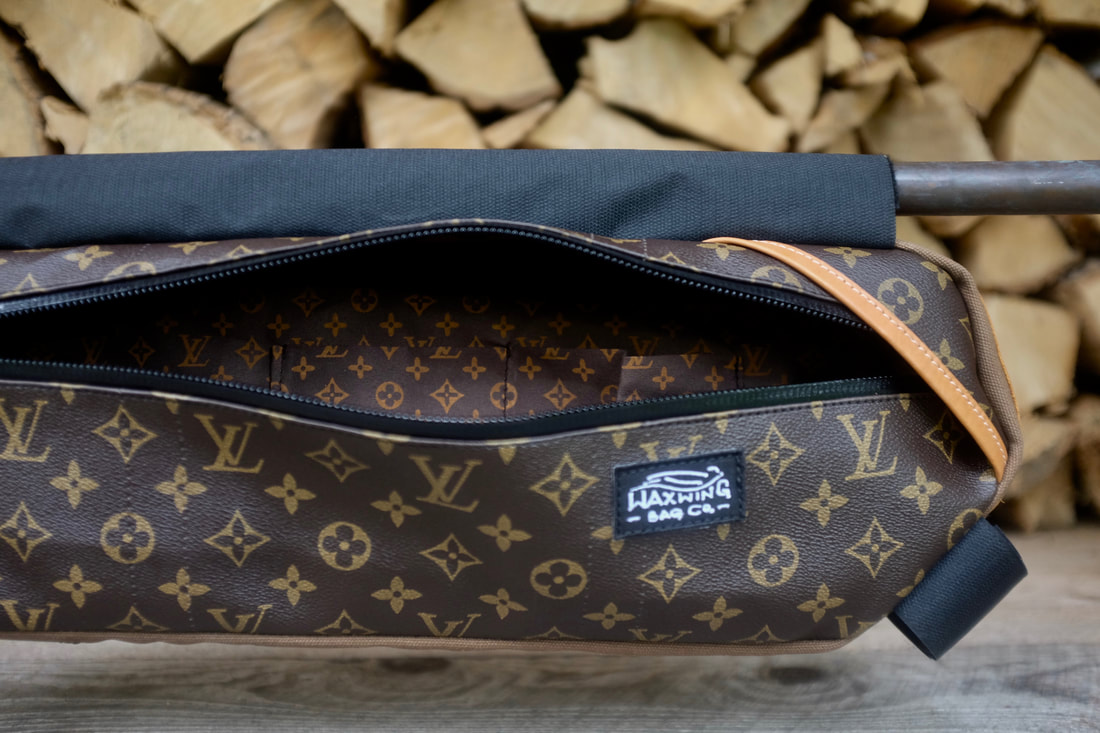
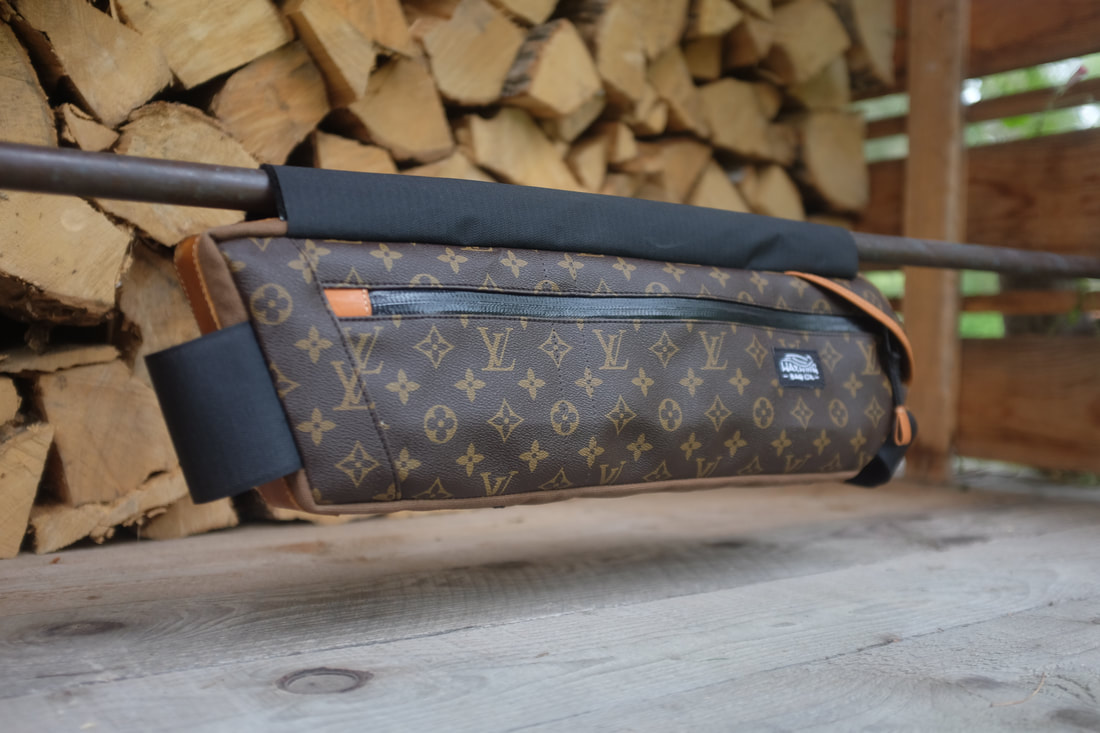
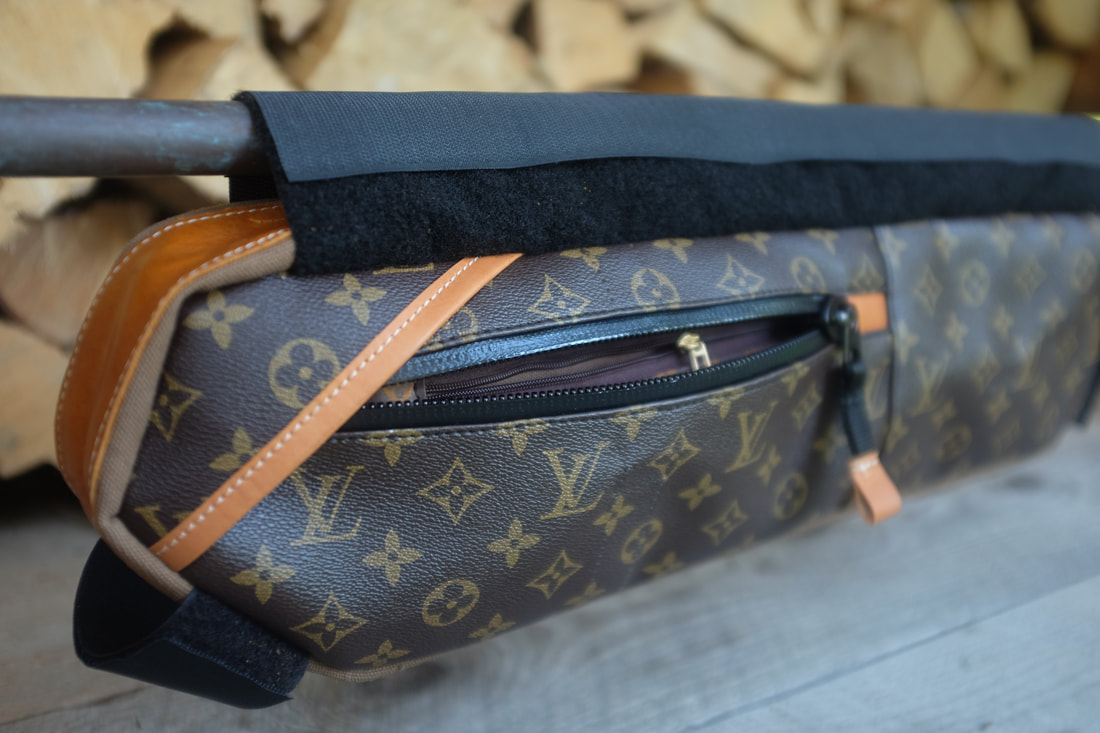
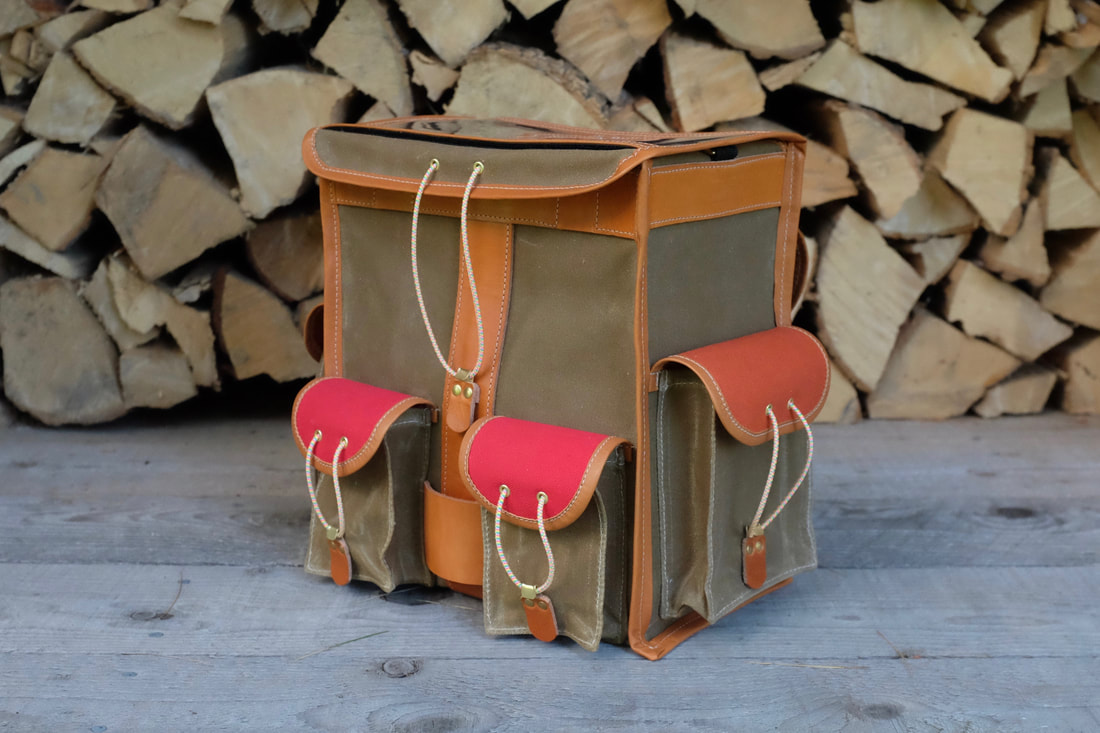
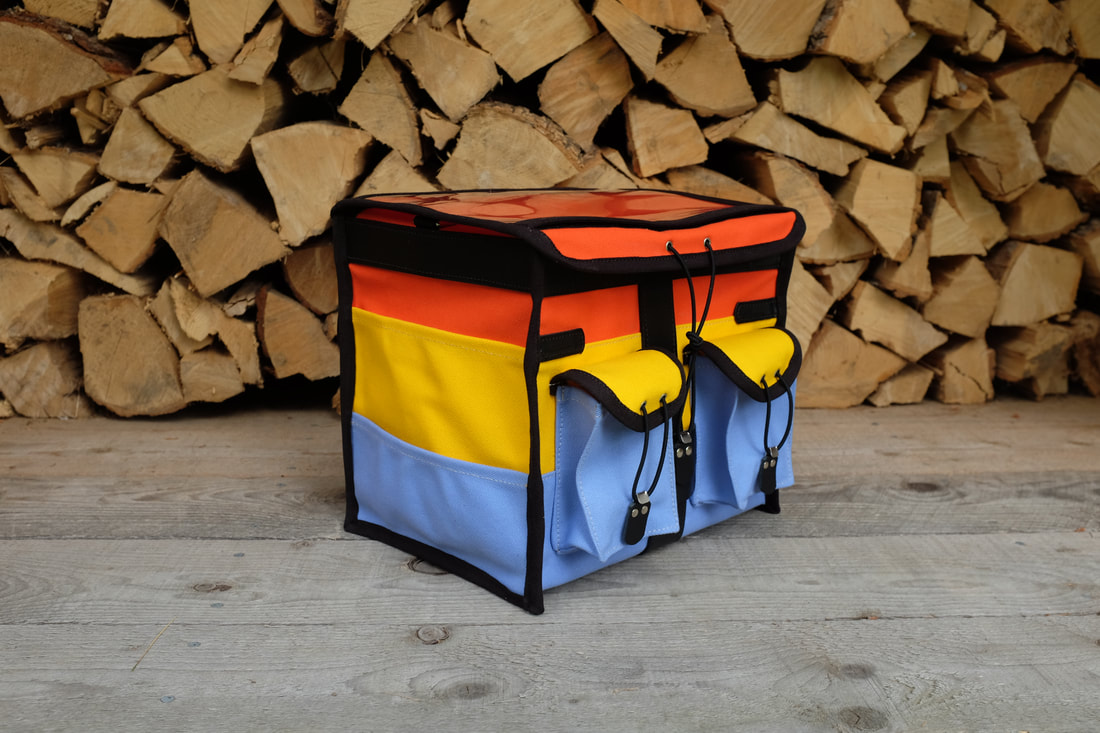
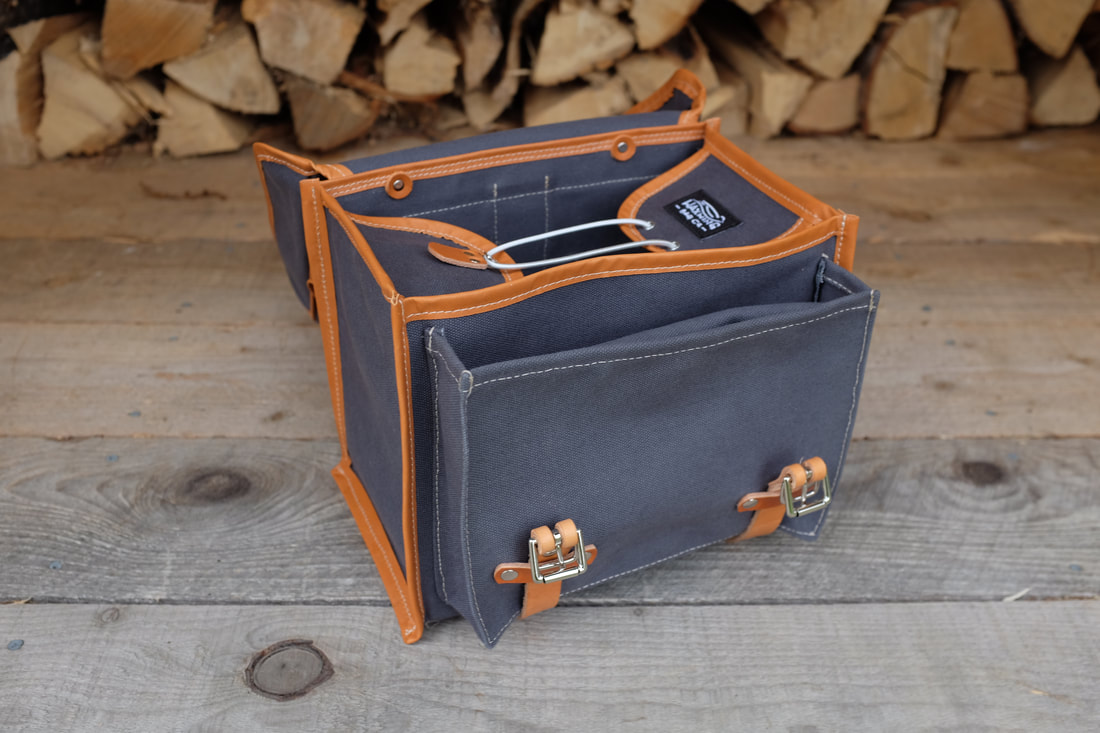
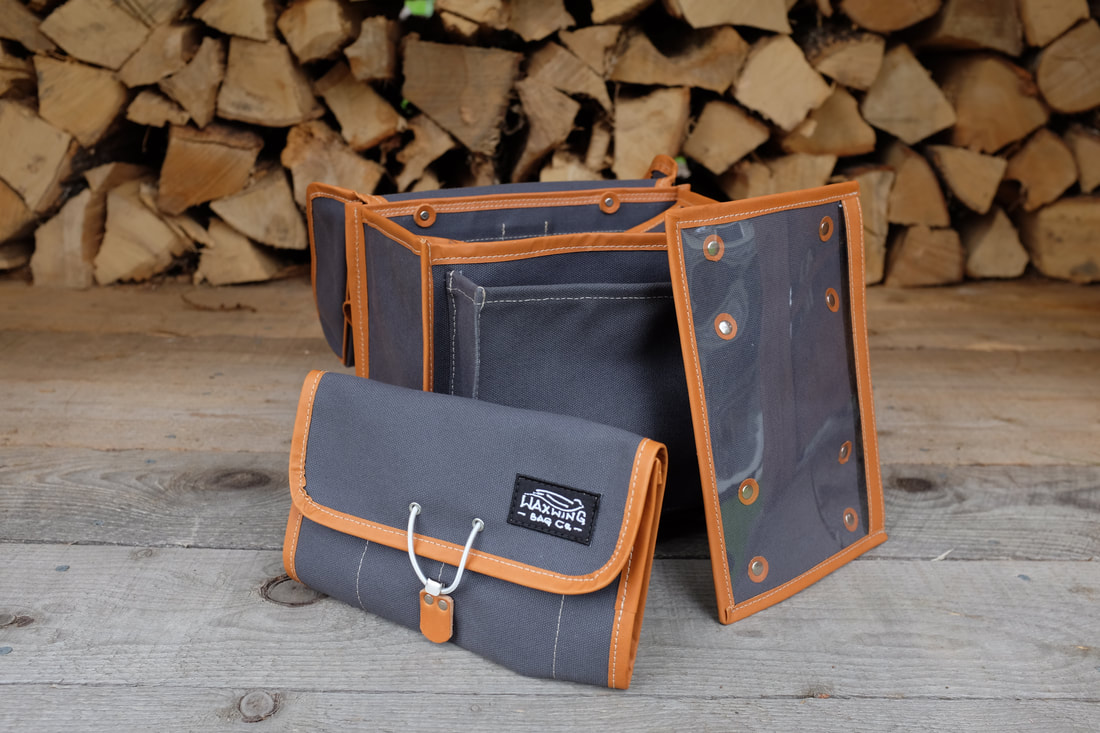
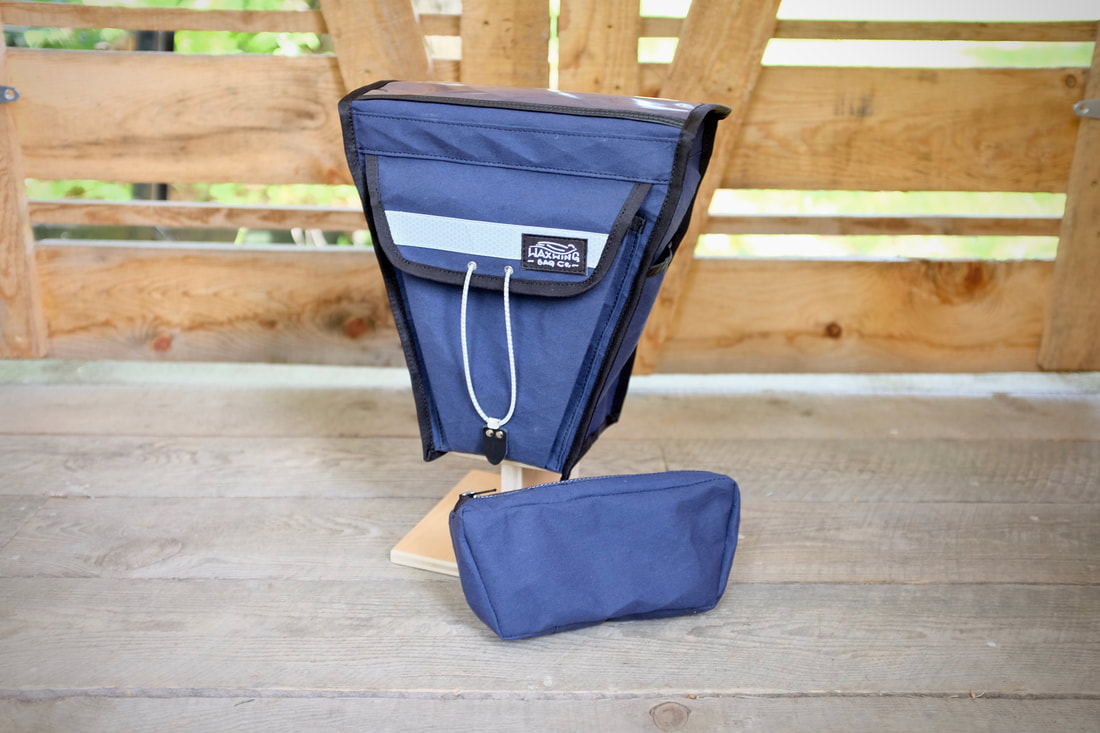
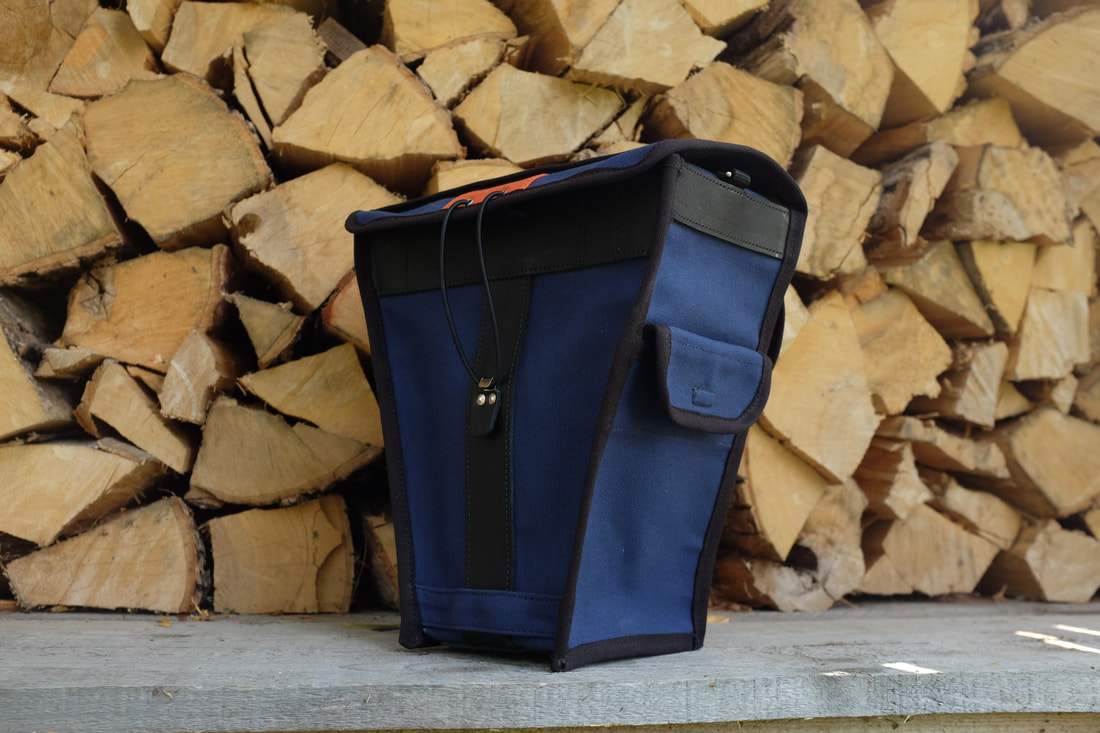
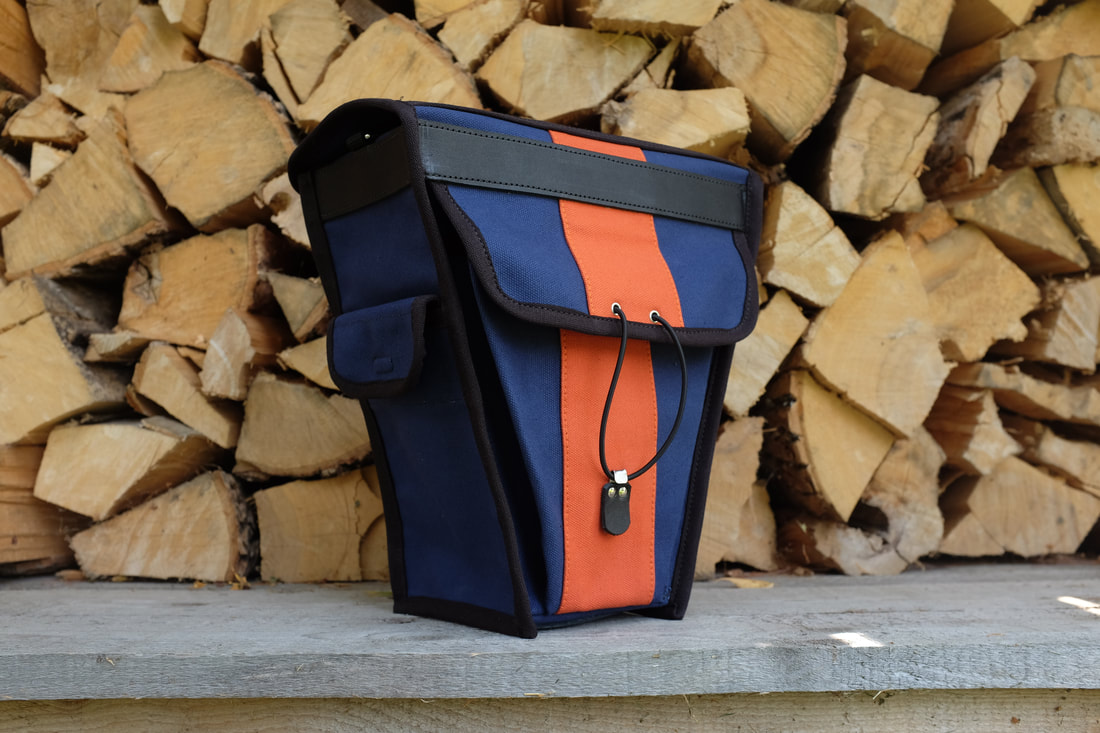
 Periodically I make a bag (or set of bags) that I’m so excited about they never see the light of day. They remain buried in my photo files, described only in my head, viewed by only myself and the customer. They are "oo’d" and "ah’d" over by no one. That's not because I don't want to share--quite the opposite. Sometimes in the flush of excitement and pride I tell myself that This One is special enough that I need to set aside some time to properly feature it, maybe write a whole blog post calling out the details, highlighting the innovative features, and including lots of photos–you know, give it it’s rightful moment in the limelight. And then it happens. I look at the work queue and diligently move onto the next project, letting that Featured Project slide into obscurity, perhaps never to be seen. So, I’d like to share a few projects from 2021 that deserve a moment of attention before we launch headlong into the new year.   This Waxing Longflap Saddlebag was made for a customer in Brooklyn last spring. In terms of size and shape it is no different than the standard issue, but sticks in my mind for it’s aesthetics. The bag is made of Navy #8 waxed canvas–a subtle and deeply lustrous color. The plan called for accent stripes in Butter and Terra Cotta–colors not available as waxed material. As an experiment, I decided to try waxing the canvas stripes so they’d match the visual and textural quality of the rest of the bag. I made a homebrew of paraffin and beeswax and saturated the accent colors. As one would expect, it deepened them, and the result was perfect. Together with the rest of the bag they created a beautiful and unified whole. Waxed canvas options are limited and tend towards conservative colors, so being able to expand the palate a bit is exciting and opens up possibilities. Note the snap closure on the cover strap. I call this the Quick Access Snap and it allows you to open the main compartment by simply unsnapping the straps. I find buckles cumbersome to open repeatedly, particularly when I’m impatient or the weather is bad. The snap option maintains the adjustability of buckles, but facilitates opening the bag easily. If you ask me, it's the way to go! 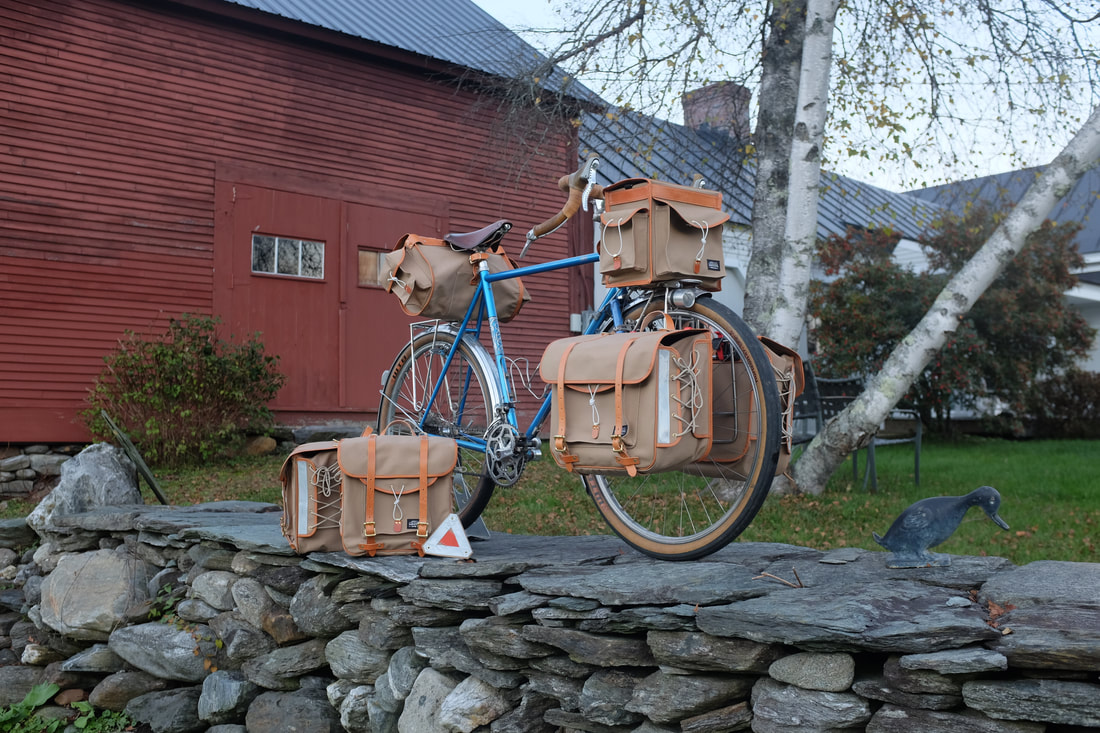 We all loved Yehuda Moon, right? If you are not familiar with “Yehuda Moon and the Kickstand Cyclery”, Yehuda was the central character in the web-based comic strip that ran for a number of years starting in 2008. Yehuda embodied a “BOB-ish” approach to life and cycling; his daily commutes offered a musing on the joys of moving on two wheels while he negotiated the irritations of modern car culture and humored the friendly taunts of his speed-focused co-worker Joe. Anyone who’s ever commuted on a bike could easily see themselves in Yehuda. Like many others, I loved the poetic vignettes and lovely comic art.  Imagine my utter amazement when none other than Rick Smith contacted me to order a substantial set of Waxwing bags. Yes, Rick Smith, the creator of Yehuda Moon! I was beside myself. In writing back to Rick I indulged my fan-excitement, let him know how much I loved his work and then gathered myself together and got to work. Making bags for Rick would be, you know, sort of like making bags for Yehuda himself. How fun! Rick plans to do some long-distance touring in the next few years and this set of bags will be ready when the time comes. In the meantime they'll meet his needs for journeys closer to home on his Rivendell Saluki. The set includes front and rear camping panniers, a medium front handlebar bag, a large longflap saddlebag, and a matching reflector to round it all out. You could carry a lot of gear with this group of bags! 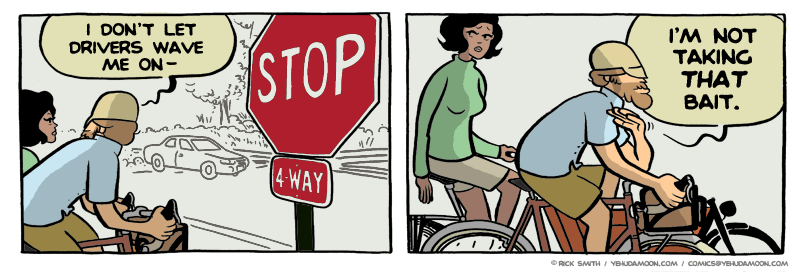 You might notice I shortened the rear panniers front-to-back dimension from 14” to 12” to avoid heel strike issues. (The front set remain standard at 14"). A DockIt decaleur and a set of RaClips provided the attachment scheme for the front bag while the panniers are all secured using RixenKaul mount hardware, which has become my standard go-to. 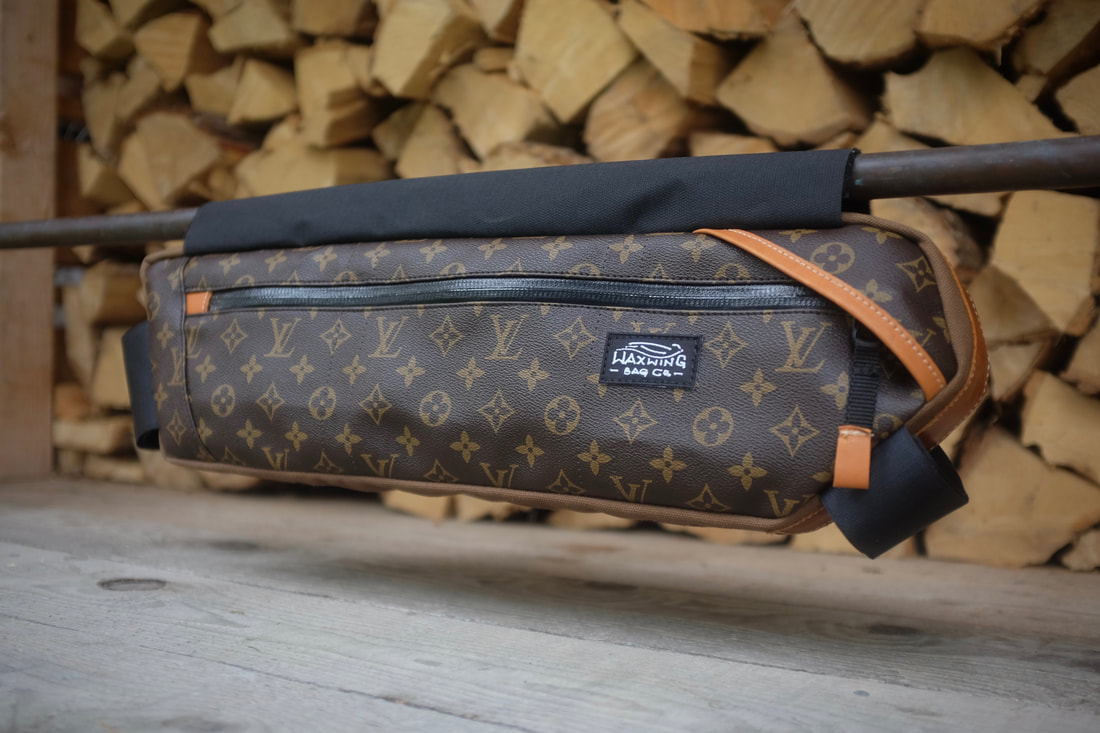 File this one under: You Can’t Buy this Bag on 5th Avenue. I had the great pleasure of making a frame bag for a fellow Vermonter out of a deconstructed Louis Vitton bag. Working with patterned fabric requires care to ensure the pieces are cut correctly for the left and the right sides and that the pattern lines up neatly. Note the original bag’s printed lining used for internal pocket material. Word is the owner is on the hunt for more material for the next bag. What a fun challenge!  "Can you take this shoulder bag and use it for inspiration?" Of course! Given the array of colors I have available, I did my best to touch on the beautiful shades of this shoulder bag. The handlebar bag was a gift to a brother from his siblings, and I must say, being given free reign to interpret made me a little nervous, but word is the lucky brother is quite happy. It's an honor and a pleasure to be able to do this work. Sometimes a project requires specifically that I NOT share it for reasons important to the owner –in one instance the bag I made is a part of a project-in-development that isn’t yet public-- or in this case, the bag is a central feature a bike shop is using with a new build to highlight the shop. The slow trickle of components has meant patience in this one seeing the light of day. Similarly, a bag specifically designed to house an e-bike mechanism is still under wraps. 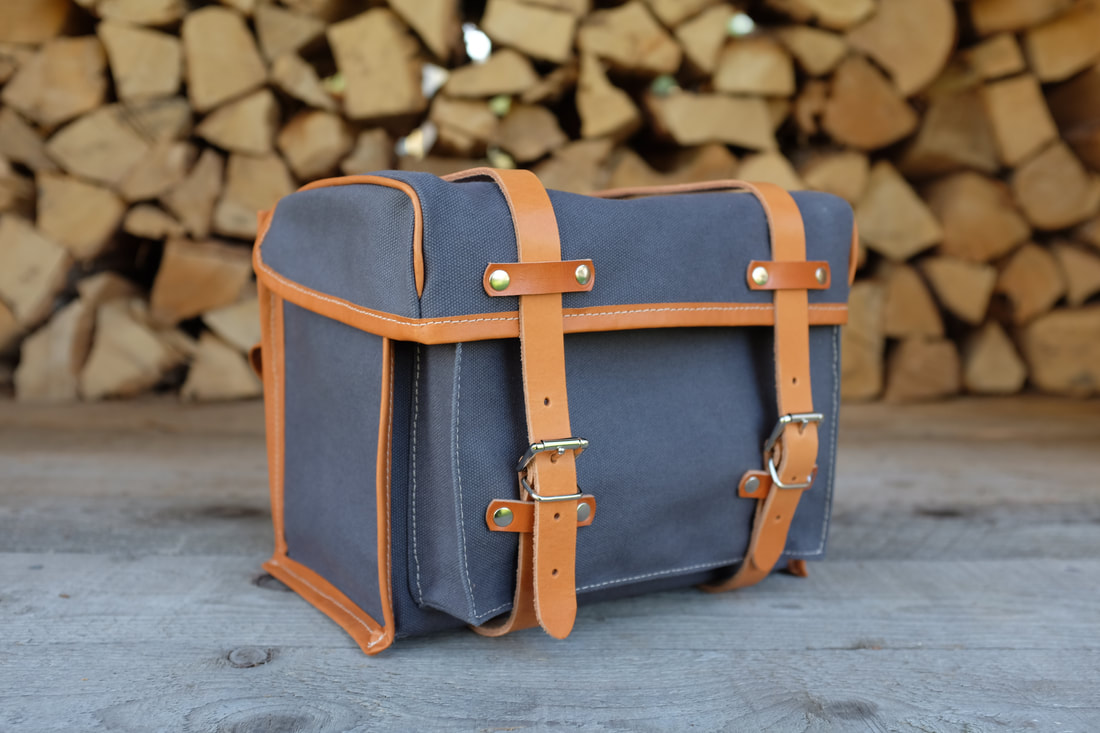 Lastly, I want to spend a moment musing on a bag I’ve long wanted to make, but had not yet found the opportunity. This bag is modeled on the classic Alex Singer style front bags with up-and-over the top straps providing the closure. I find this bag gorgeous and was so pleased to make one for a rider’s Jo Routens; it just seemed appropriate and right for a bike of this pedigree. Since a sewn-in map case would sully the neat appearance of the cover, I made a removable version that I’m happy with. A matching tool roll sized to fit the front pocket rounded out the project. I don’t often get myself in the project queue, but I might have to get in line for one of my own later this year. I could share many more projects that deserve some attention, but I won’t test your patience! It's good to look back and take stock while I anticipate what the new year will bring. Part of the fun is seeing the amazing ideas and challenges my customers bring to me. I’m excited already. Thanks for following along and I wish you and yours' the best for 2022! Comic images: ©Rick Smith/yehudamoon.com/[email protected]
7 Comments
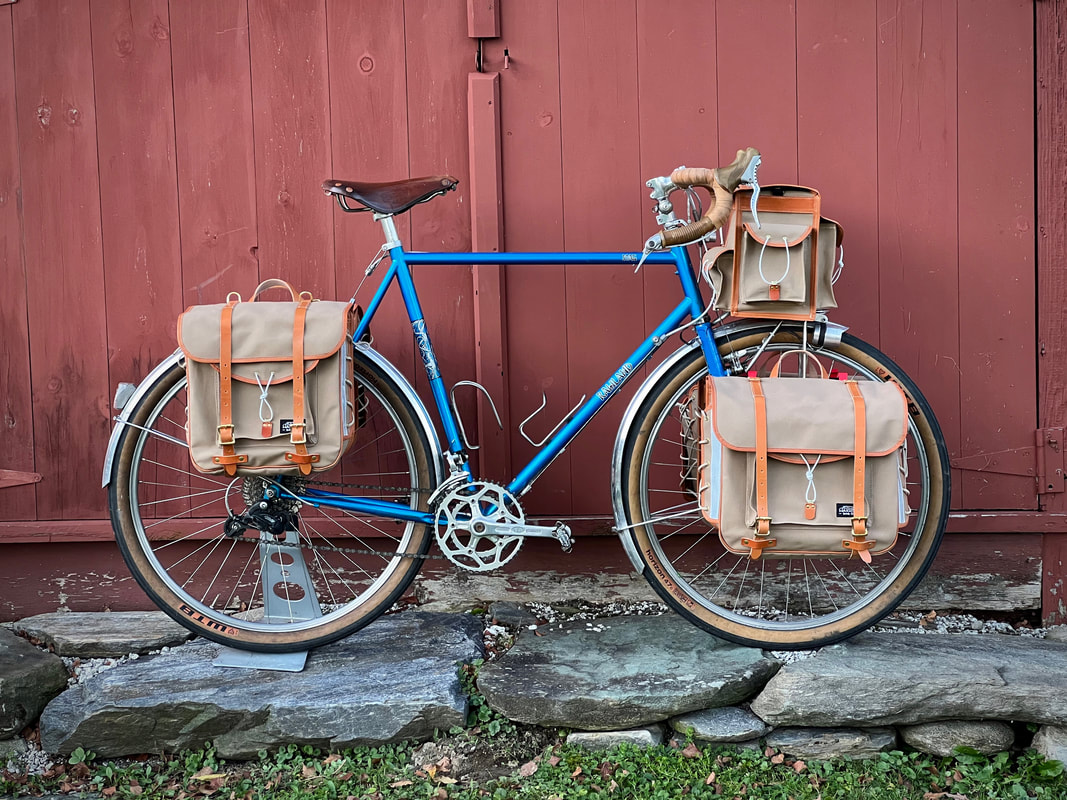
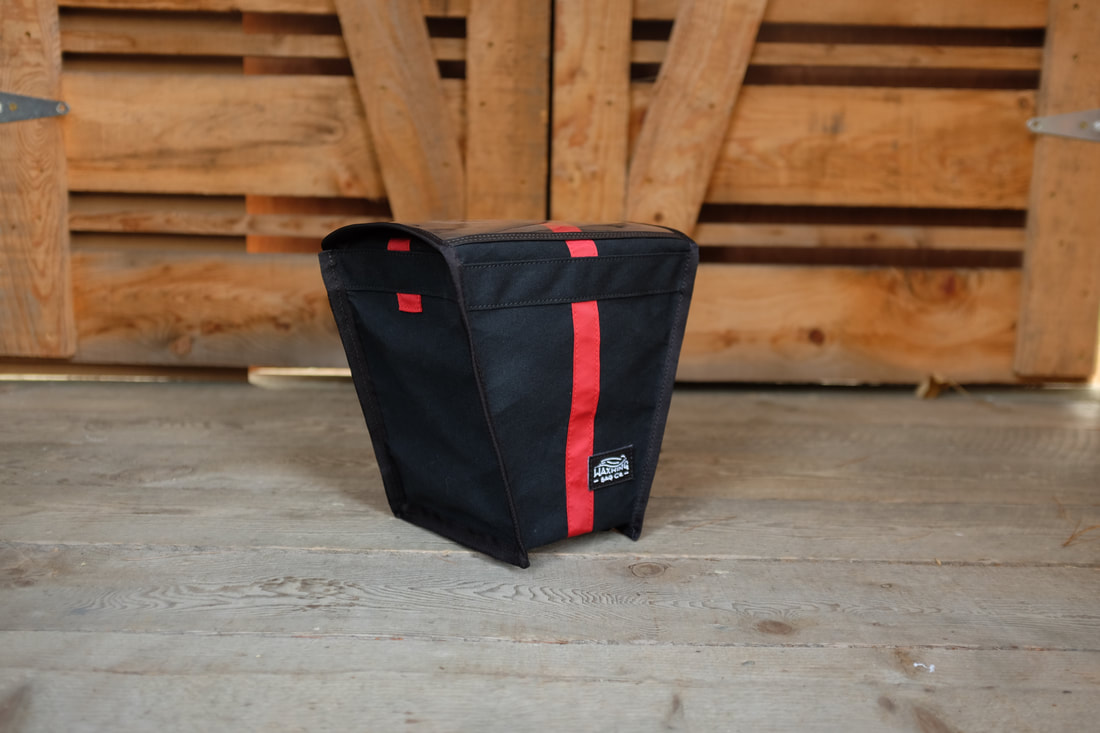
 As you fly down the twisty mountain road your companions drift out behind you; turn by turn you swiftly course through successive corners and straightaways. You are in your element. Over the wheel, your trusty bag sits securely mounted on the rack, forging the way. You tuck in against the wind and your eye glances at the bold flash of color that adorns your bag and you smile. You know that stripe is the critical reason your friends are simply not able to keep up. Racing stripes have long adorned all manner of sports equipment, cars, boats, and clothing. Jauntily advertizing speed and good looks, a racing stripe no doubt adds a bit of fun to the spirit of competition, but is that all there is to the story? Is it possible that the racing stripe is doing more than adding a bit of style? Is it true that the rumored “stripe effect” is in fact a contributing factor in the quest for speed? The short answer we now know is yes, stripes make you go faster, but only in certain conditions, and surprisingly, the color of the stripe can add small but measurable advantages to this effect. We'd read stories and anecdotally heard chat among seasoned randonneurs that "stripes pave the way". Perhaps, but sometimes perception is not the same as reality. We needed testing to know for sure, so we recently spent time evaluating the effect racing stripes on a Waxwing bag have on the rider's descending speed. Rigorous testing now provides the data to show this is in fact a real phenomenon, most importantly when moving at speed on descents. What’s more, we were astounded to find that the color you choose can increase your speed even more. 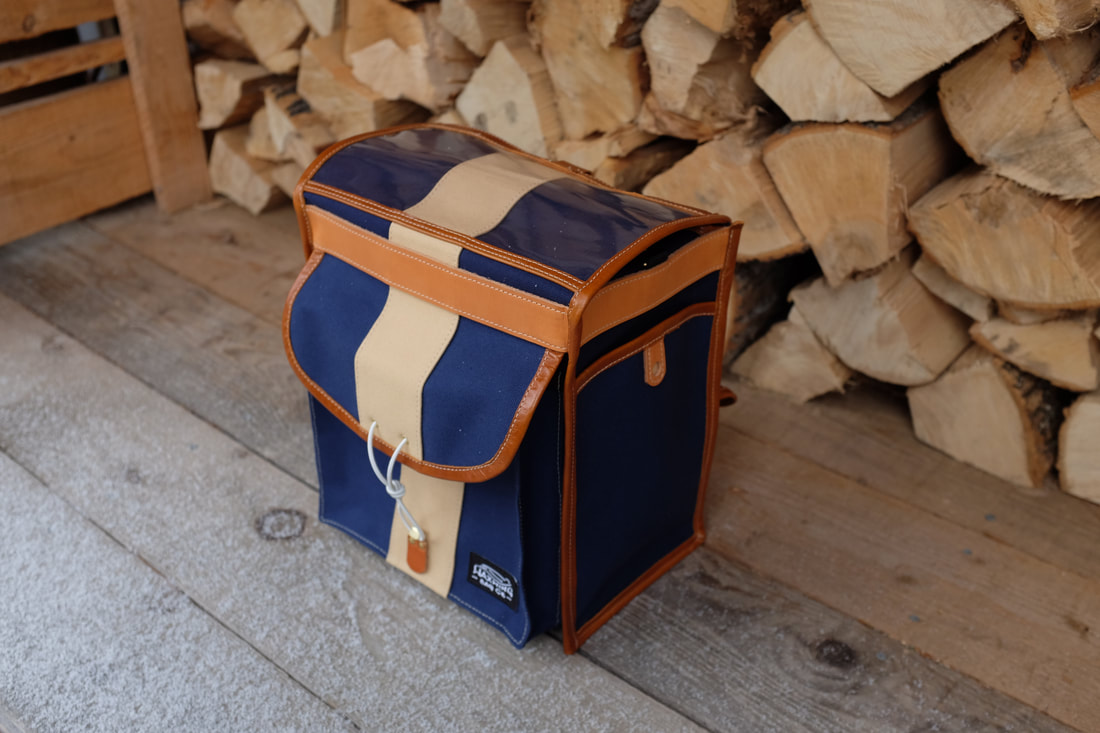 But let's go back to that mountain descent for a moment. Our research has shown that the brightly colored red stripe adorning your bag is actually creating the first instance of a low pressure space at the front of the bag which is magnified as the air flow passes the stripe, then the sides of the pocket, the body of the bag, and finally past the bike and rider. In essence, the stripe is initiating the Bernoulli's effect sooner than would happen on an identical bag with no stripe. The Bernoulli principle describes how sails move boats into the wind and wings lift airplanes into the sky. In essence, a sail, a wing, or, in our example, a racing stripe, creates a small low pressure zone when the movement of air is forced to move at two different speeds. In an attempt to equalize that pressure the sail, wing or stripe move in the direction of the oncoming air. In our situation, the recess at the edge of the sewn fabric stripe on the front of the bag creates a very small but important low-pressure area at the edge of the sewn stripe that begins a pulling effect as the air continues to move past the bag. The bag is pulled into the low pressure zone, just a boat moves into the wind. 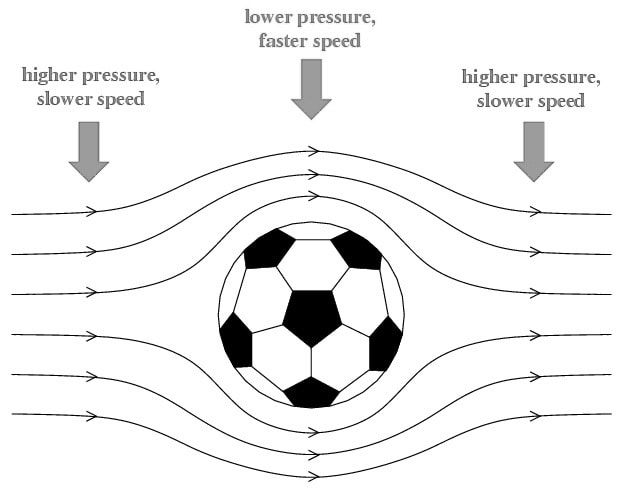 In the image of the soccer ball you see the pulling effect demonstrated; the stripe magnifies the effect just as the curvature of the ball forces air to move to each side. Image credit: https://www.physics.hku.hk/~phys0607/lectures/chap05.html 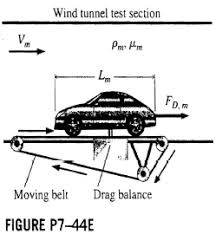 Having long heard that “racing stripes make you faster” we wanted to see if there was a way to test the idea. We visited the Vermont Ski Technology & Research Institute associated with the university, which is world-renowned for studying the air flow dynamics of skiers and their equipment. As in biking, wind resistance is the overarching factor limiting speed. Gravity is the engine that moves skiers; so to replicate the skier’s sliding movement the Institute employs a device known among the staff as the “infinite hill, which is a treadmill-like machine. It is housed in the variable density wind tunnel the institute has maintained since it was built in 1924. The "infinite hill" can be set at any angle to approximate the slope of a ski course and the ski surface is a synthetic polymer that provides an artificial “slide” in place of actual snow, allowing the test skier to “ski” in place. The wind tunnel can measure every facet of a skier’s performance and control for variables that would be impossible to measure on an actual ski slope. For our bag tests the polymer tread was replaced with a tactile rubber tread that provided a secure surface for the test bike’s descent. 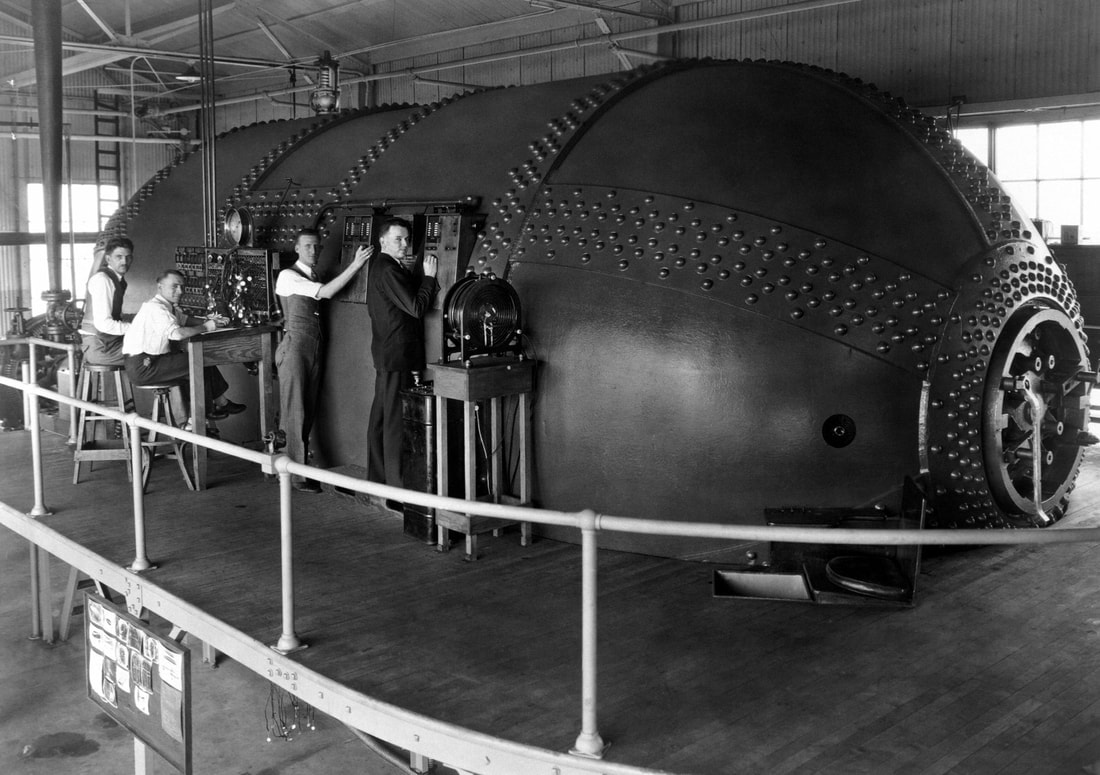 (Image: Variable Density Wind Tunnel shown in use in 1929--the same equipment is still in use today at the test facility we visited. Image courtesy of Vermont Ski Technology & Research Institute Archive/ NASA on the Commons) Over nearly 14 hours of exhaustive double-blind testing we established a baseline roll speed at a 30 degree pitch with a generic bag with no pockets, stripes or other protruding features (seen in photo below). Next we tested the roll speed of a standard Waxwing bag with front and rear pockets, but no racing stripe. The results quickly told us that simply the shape of the bag offered measurable advantages over the simple box shape, which was expected. The third segment tested an identical bag, but with a racing stripe. We saw statistically significant benefits immediately, even before we did a thorough statistical analysis to eliminate “noise” in the data as the day wore on and the test rider became more tired. 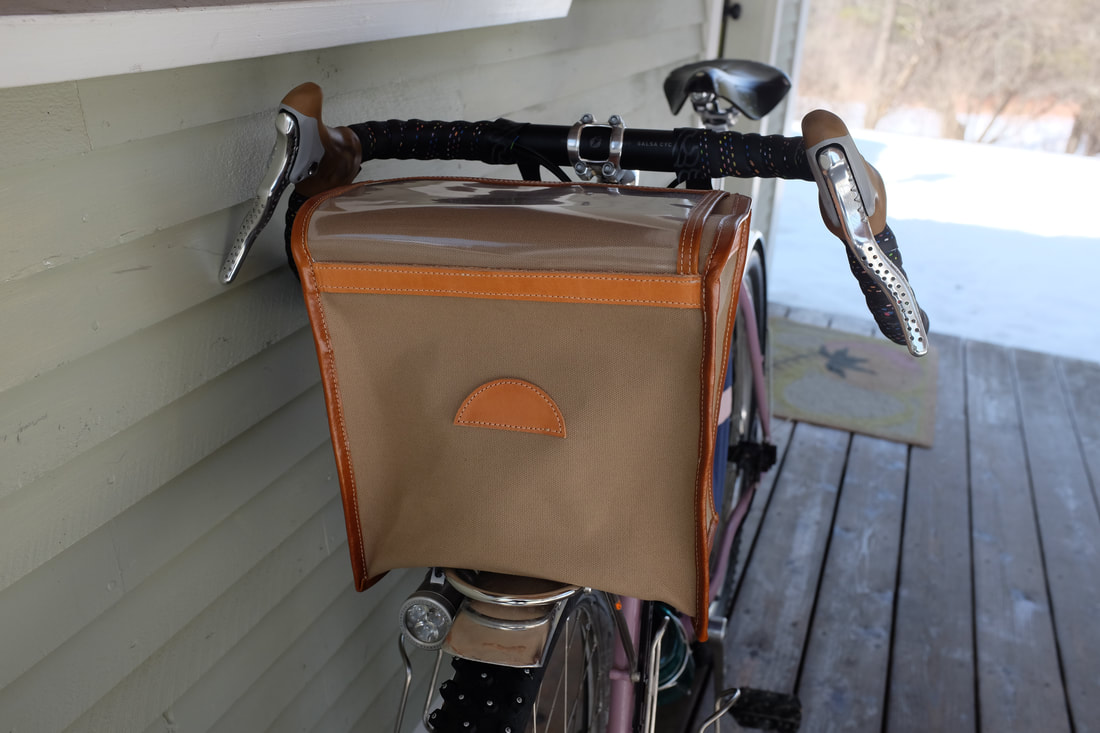 Test bag used to establish baseline airflow dynamic performance. Note abscence of pockets, stripes, or other significant protruding features. Once our testing established with certainty the racing stripe offered meaningful gains in speed, we wanted to go one step further. Is it possible that the color of the stripe could make a difference in performance? We brought in three identical bags, one with a grey stripe as a test neutral, one with a white stripe and finally one with a red stripe. We found there was little difference between the performance of the grey and white striped bags, but soon noticed the red striped bag had marginal benefits over the other colors. We can’t be sure why this is but speculate that the red color excites molecules on the surface of the fabric faster than more muted colors, and thereby warming the air as it passes the fabric surface. We know that warmer air is less dense and thus easier to move through. The calculation of the drag force of air (FD=12CρAv2 F D = 1 2 C ρ A v 2) depends on the density of the fluid (air), so the warmth created by the red color seemingly “thins” the air mass as it passes the bag. Although we were able to demonstrate that the color of the stripe does indeed offer some advantage, our tests show that the gains are not so great that one would choose a color solely for this reason.  The test data confirmed the color of the stripe offers marginal gains in speed. The “stripe effect” was most pronounced during descents; while still apparent on flat roads, the gains decreased in direct proportion to the grade of the riding surface. We found no measurable advantage while climbing. Left unanswered by our test were the question of multiple layered stripes. Could this amplify the “stripe effect”? Further, we wonder if the width of the stripe may affect the speed benefits. We cannot say but suspect diminishing results as the added weight offsets the initial gains. Hopefully others will build on this illuminating research going forward.  In conclusion, we can say with confidence that a Waxwing Bag Co bag with a racing stripe will not only make you stand out amongst the crowd for your good taste and appreciation of top notch gear, but will offer a measurable speed advantage while cruising down those steep mountain roads. We are glad to have demonstrated categorically that the “stripe effect” is real, allowing riders to readily add style and speed benefits with a simple choice.
Stripes do in fact "pave the way" Footnotes:
 Can a bag be too big? I recently completed a 13.75” tall bag which got me thinking about some the largest bags I’ve made. How big is big enough? Is there a limit for size? Four examples come to mind that stand out, literally. The one-bag-to-rule-them-all is unquestionably Alain's colossal porteur, achieving the gold medal at a stratospheric 15” in height and nearly as wide at a remarkable 14.5" (15” tall x 14.5” wide x 10” deep overall). I was initially cautious about the wisdom of making such a large bag, but gained confidence in the project as I came to feel sure Alain was clear about his goals. (Seen above with a 8" standard Waxwing bag, and below, on its own)  Claiming the silver medal is Glenn's newly minted bag reaching a towering 13.75", seen below. This bag straddles that point between "really big handlebar bag" and a sort of tall porteur; the proportions are adjusted such that the bag looks reasonably normal, despite it's notable size. Overall dimensions are 13.75” t x 11” w x 7.5”d, and it's made of waxed Brush Brown canvas. 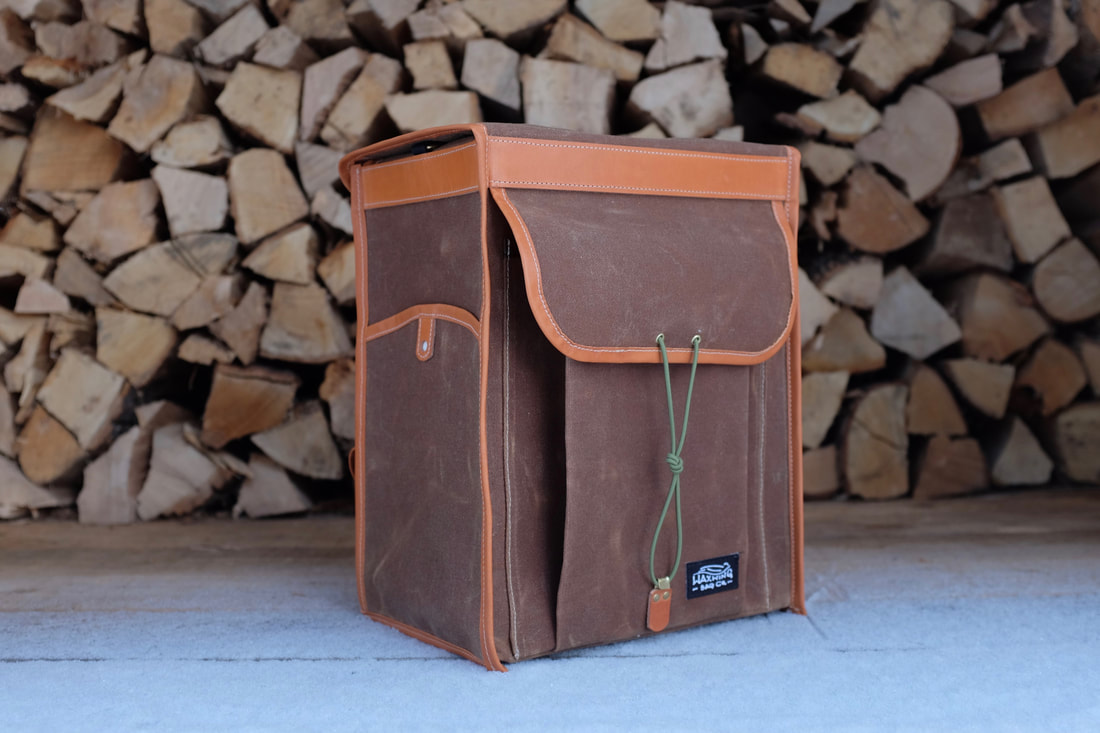 Maintaining its perch, but knocked down a notch by Glenn's bag, Geoff's bag holds the bronze at 13". This is one of the first bags I made in the early days of Waxwing and it's still going strong. At 13” t x 10” w x 6” d, it is probably safe to consider this an extra tall handlebar bag. For reference, standard Waxing front bag heights are 8", 9.5" and 11", each with a 10" x 6" footprint.  Honorable mention goes to Christine's porteur, below. While her bag has a traditional porteur configuration; 14" w x 11" d x 9" t, it is deceptively large. The key being the expandable sleeve which can be tucked away within the bag, or expanded when needed allowing the bag's capacity to grow by a third, standing proud at about 15" tall when completely filled. She wanted to be able to fit a six-pack and a dozen eggs in the bag. It think there's 10 dozen nesting here! 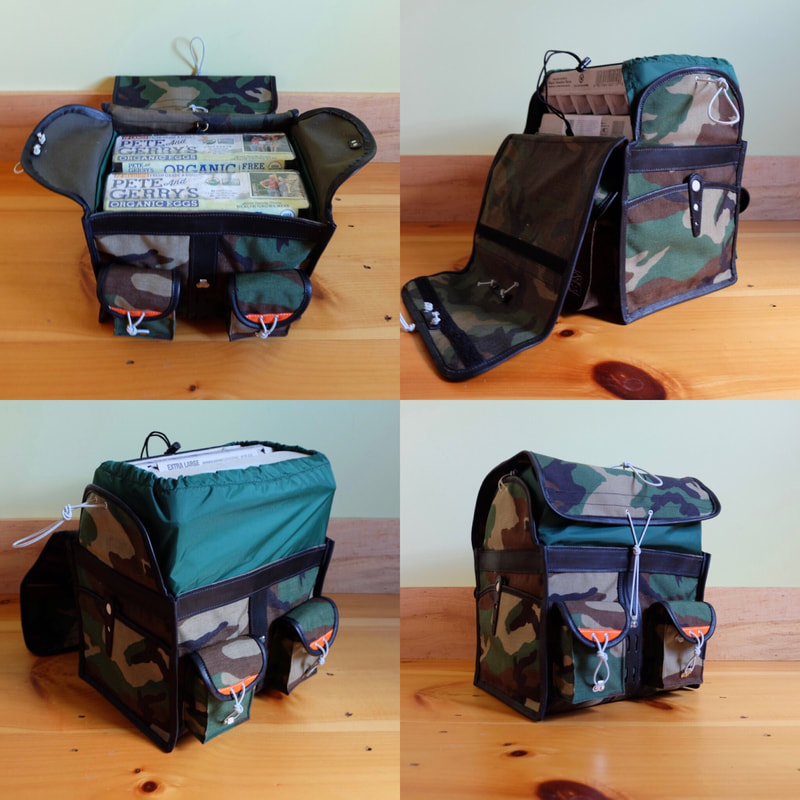 How does this collection stack up together? Here are the bags mentioned along with the standard Waxwing handlebar bag sizes for comparison. 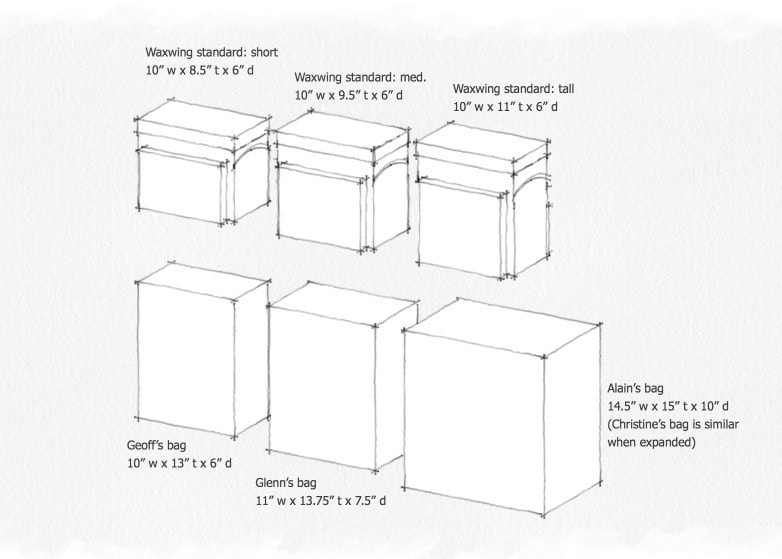 How big should a bag be? Answering this question means balancing a number of considerations. First off are the constraints of the bike itself; how much bag can fit within the cockpit of the bike? Will the bag tower over the bars? Is a decaleur a part of the plan? If the bike has drops, how wide are the bars? Will the bag interfere with brifters or brake action? Can the rack support the expected load? There's also the rider; tall riders have taller frames, allowing more vertical space between the rack and the bars. Geoff's bag looks right on his bike, because both he and his bike are tall enough that everything is in proportion. Ideally the bike, rider, and the bag all fit well together as a whole. A basic rule of thumb I go by is that for most bags, the bag will look out of proportion if it extends above the height of the bars. I’m always a little concerned that there’s a slight bias towards “bigger is better” when customers start proposing their wishes for a bag. Of course there will be times when a bit of extra space is handy for everyone, but, like driving a truck that’s empty 95% of the time, it is important to ask if that capacity is more a theoretical benefit rather than a frequent necessity. There’s no one answer, having a clear sense of your typical hauling needs is valuable information when thinking about bag size. By the same token, its equally valid to ask how small a bag can you get away with, again thinking clearly about the likely requirements of the majority of your riding. And yet again, a bit of extra capacity is rarely a problem. A secure attachment plan is always important, and the bigger a bag gets the more critical attachment becomes.  I often suggest making a cardboard mock-up to get a tangible sense of how well the numbers translate into reality. It is so much easier to adjust the plan when it's only a cardboard box! Ultimately I trust the bag owner to make a decision that works best for them. This faith was confirmed by Alain, unprompted, wrote recently to report how happy he is with the bag and his decision to go with size he chose. 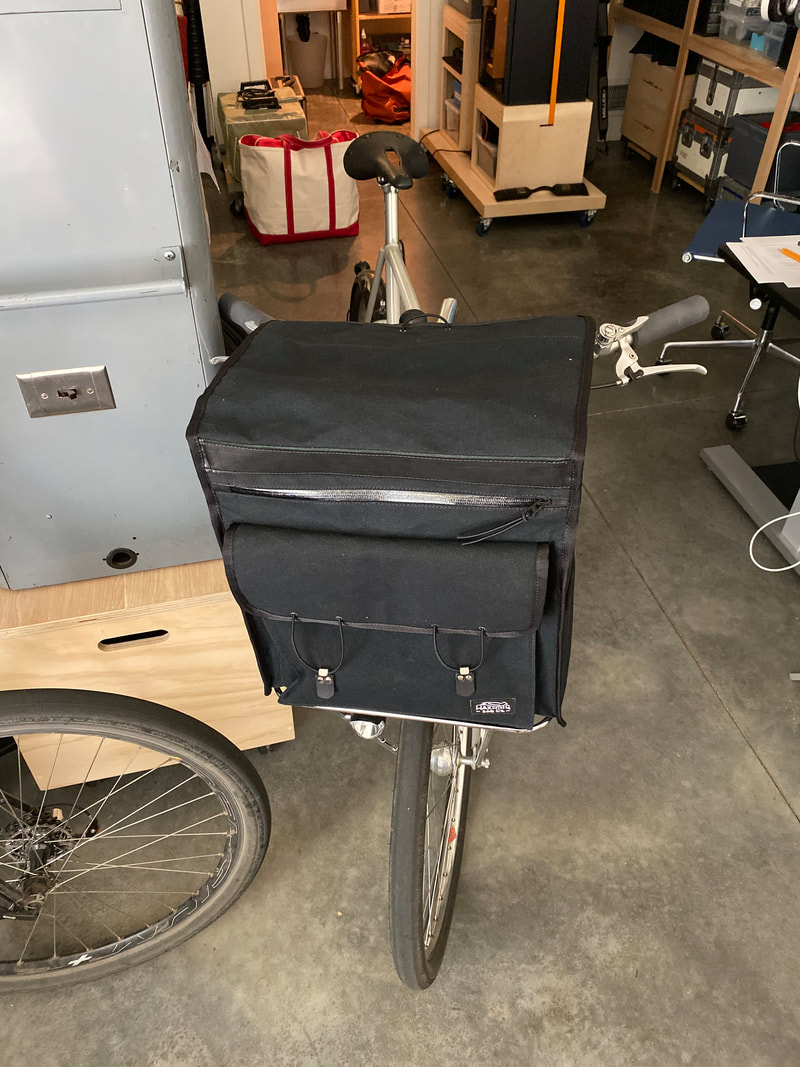 “I don't regret having you make the bag so large for one minute. I'm often cycling packages to the PO once or twice a week, and it's not unusual for me to fill the bag”. He continues, “It's never a lot of weight, just bulk, and the bag helps keep the packages and other contents safe from the elements. Also, during COVID, people mistake me for a food delivery person, and get out of my way... an added bonus!” He also noted the weight of the bag, which was made primarily out of xPac, weighed in at 1460g or 3.22 pounds, which is pretty astounding for a bag of this size. This bag features a zipped storage pocket for the shoulder straps on the front and the back; the straps are sewn into the bag and can be tucked away when not needed, creating a really clean look.  The bigger the bag, the more the elements need to be adjusted to maintain a natural look. It has taken time for me to get a feel for this, but now have some basic parameters that make it work; extending the front pocket cover a bit, lowering the side sleeves, etc... 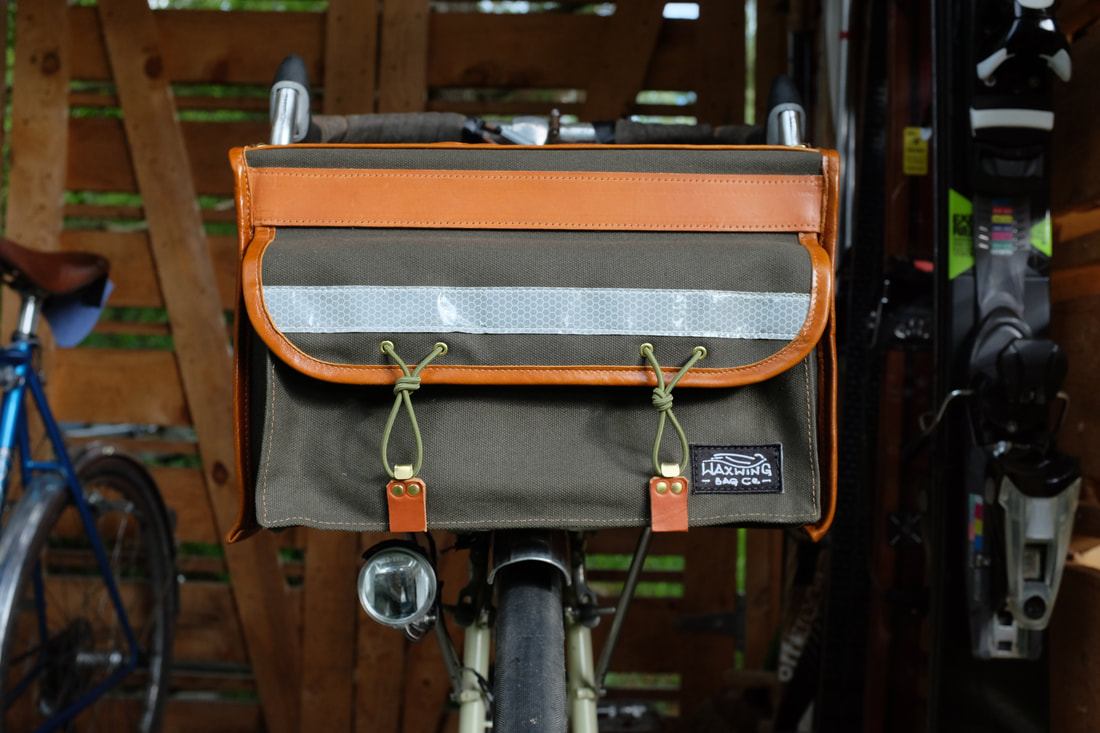 There is not a clear dividing line between “handlebar bag” and “porteur”, but for the sake of simplicity I consider any bag spec that extends out beyond the standard footprint of 10”w x 6”d or over the height of 11” to be in some sense a porteur, although one might argue that a porteur is at least partially defined by the size of porteur racks, about 14”w x 11d”.  Lastly, you might wonder about the smallest bag I’ve made. That's easy: a customer with a love for his partner--and for bikes-- wanted a mini-Rivendell Shopsack-styled bag with which to deliver a ring… how could I not help make that happen?
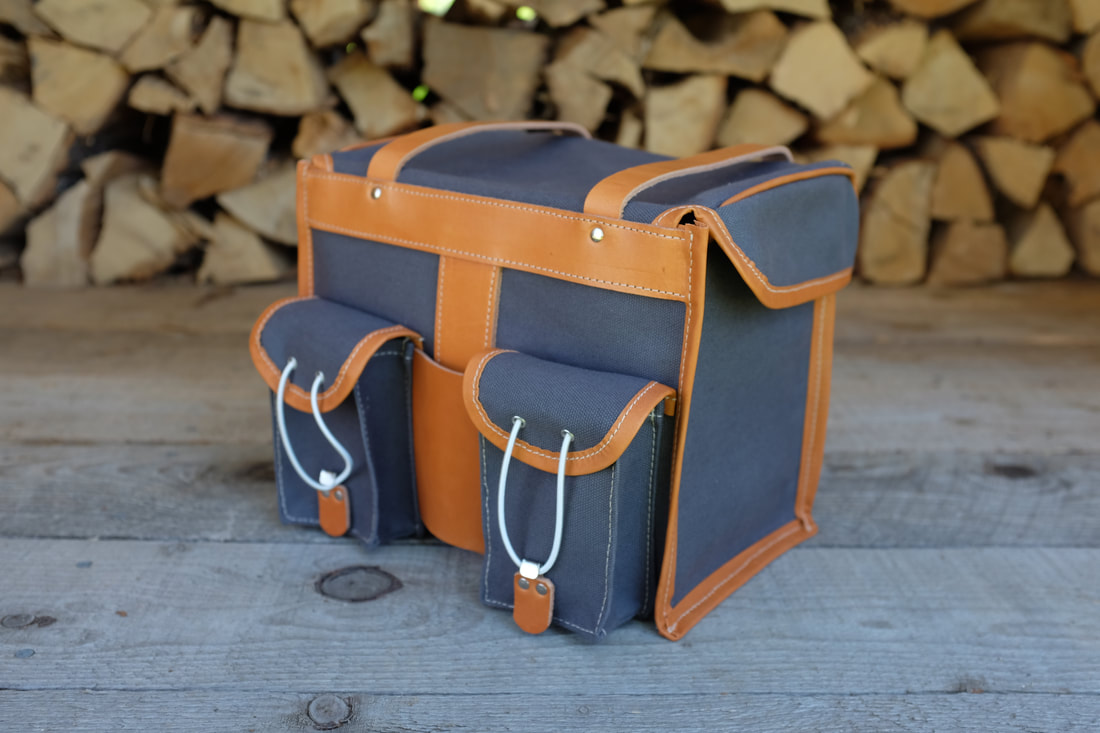
 You might see the owner of this bag pedal past you on the open road and never suspect how many fine and specific details were worked into this otherwise standard looking handlebar bag. Production offerings attempt to meet the needs of most people most of the time, but as we all know, dialing in the details of the bicycle can make a huge difference in comfort, efficiency, and satisfaction; all riders have specific preferences typically evolved through experimentation over hours of riding in all conditions. That experience is also fundamental in the planning for a new bag. This recent project demonstrates how a customized Waxwing bag can be tailored to the unique needs of a rider. With every project I note the specifications generated in discussion with the customer, often aided with the help of various sketches. For this project, friend and returning customer Gary wanted to incorporate a GPS mounting location unit into the design of the bag, freeing up the handlebars for his hands. He also wanted to have the bag cover closure located at the sides of the bag, rather than the typical closure to a centered hook. Requests like these keep things interesting. The specification for Gary’s project included:
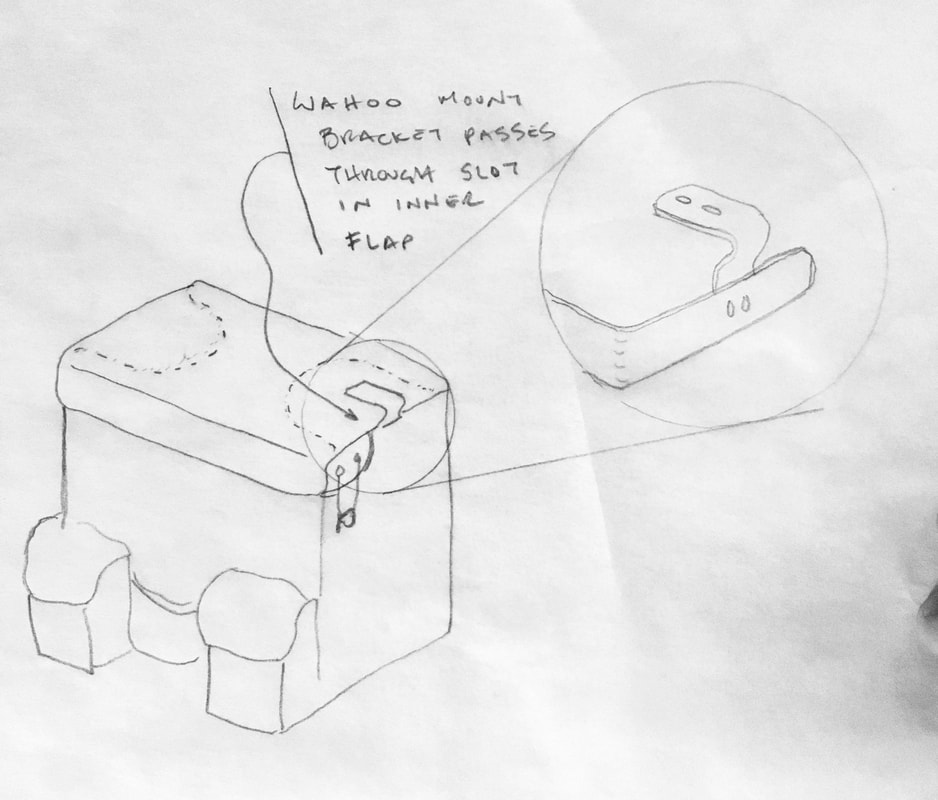
These days it's not unusual for the traditional bag-top map case to go unused, while a Garmin, Wahoo or phone is mounted within easy view of the rider for navigation. There will always be a solid argument for paper maps, but not everyone needs or wants this feature. As often as not there is a generator hub keeping this tech powered, with wiring reaching up to the devices. As the construction process began, I soon realized there was overlap between the side closure, the GPS mount bracket and the shoulder strap D-rings. The location of the hooks for the side closure directly intersected with the normal placement of the side sleeve. Momentarily stumped, I soon saw the opportunity embedded in the conflict. How nice to be able to reshape the curve of the sleeve pocket to gracefully coexist with the hooks! After multiple sketches I soon landed on a line that pleased my eye. I like how the sweep carries the line from the top of the back pockets close to the top of the front pocket. 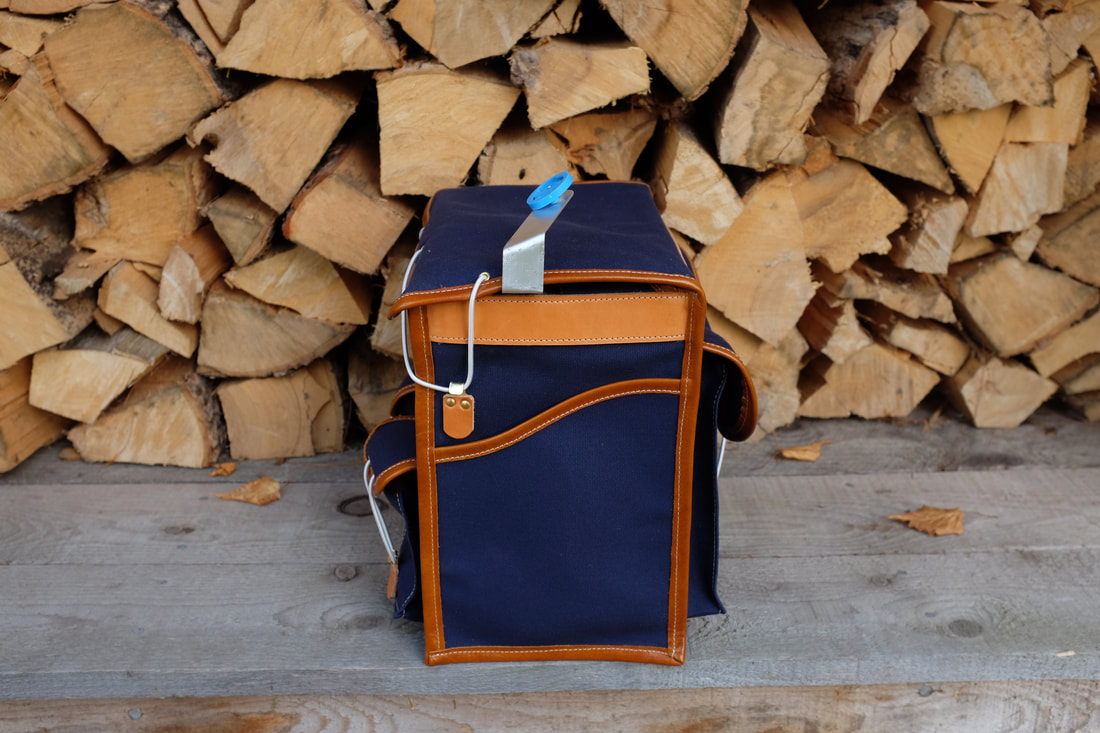 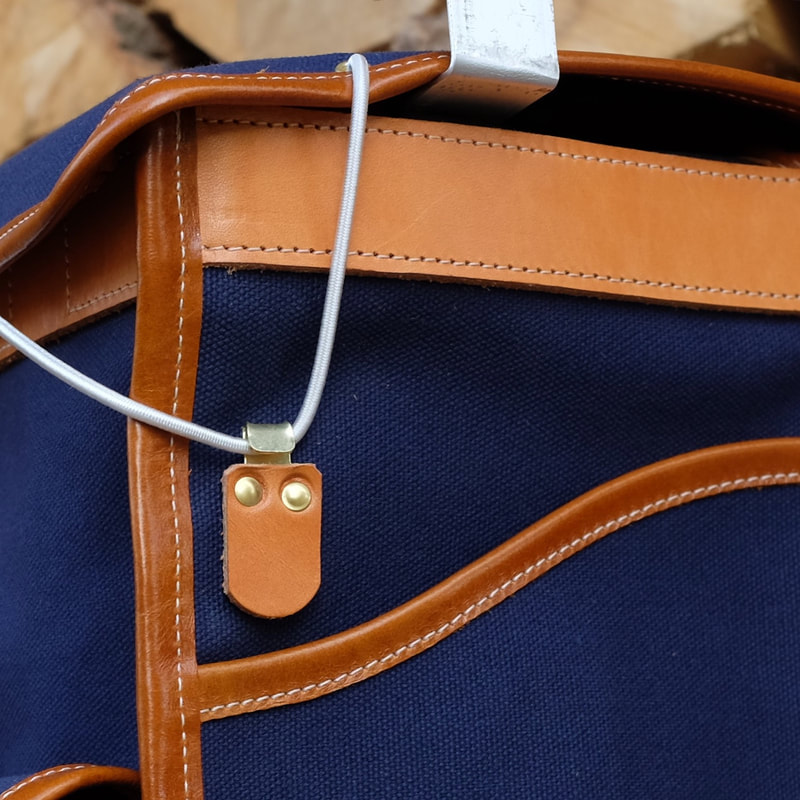 Next I focused on routing the GPS mount bracket. Using folding manila stock to make a bending template I bent the alloy stock to shape and then placed it together with the interior U-bracket to determine the positioning within the bag. 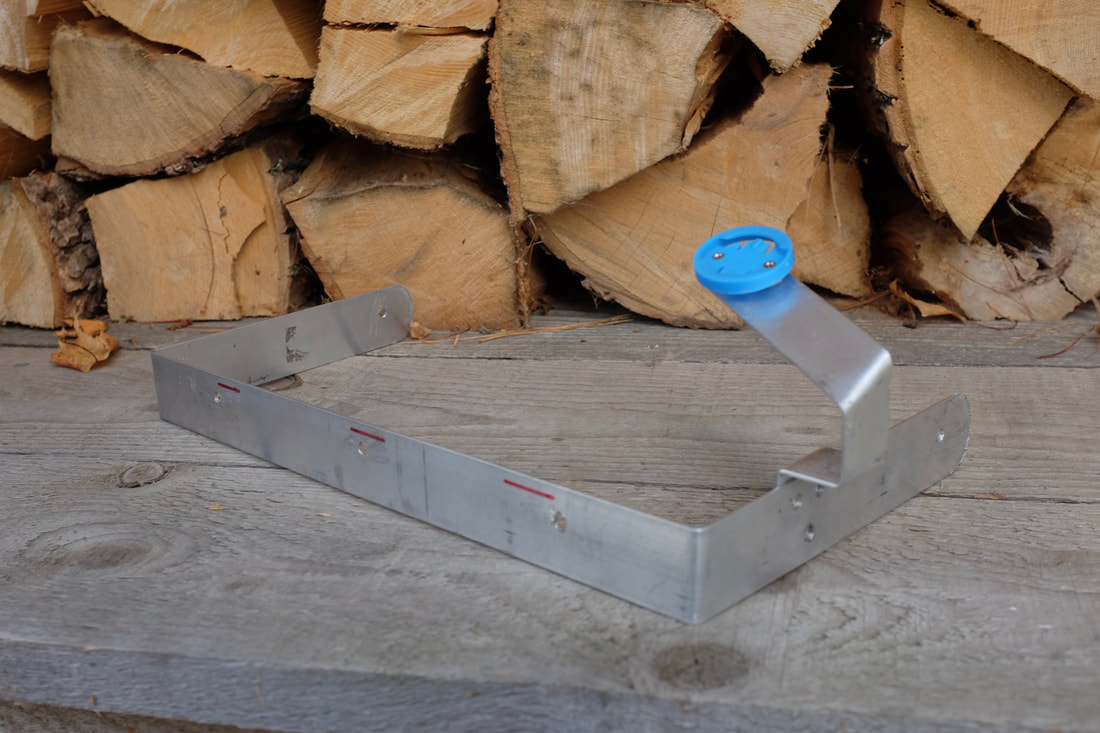 Next I created a reinforced slot into the right-side interior closure flap which again presented an overlapping issue. Normally a D-ring is placed in this same general location--another conflict! In this case I decided that there were opportunities to add D-rings later if the customer wanted them, and for now I would simply leave them off. 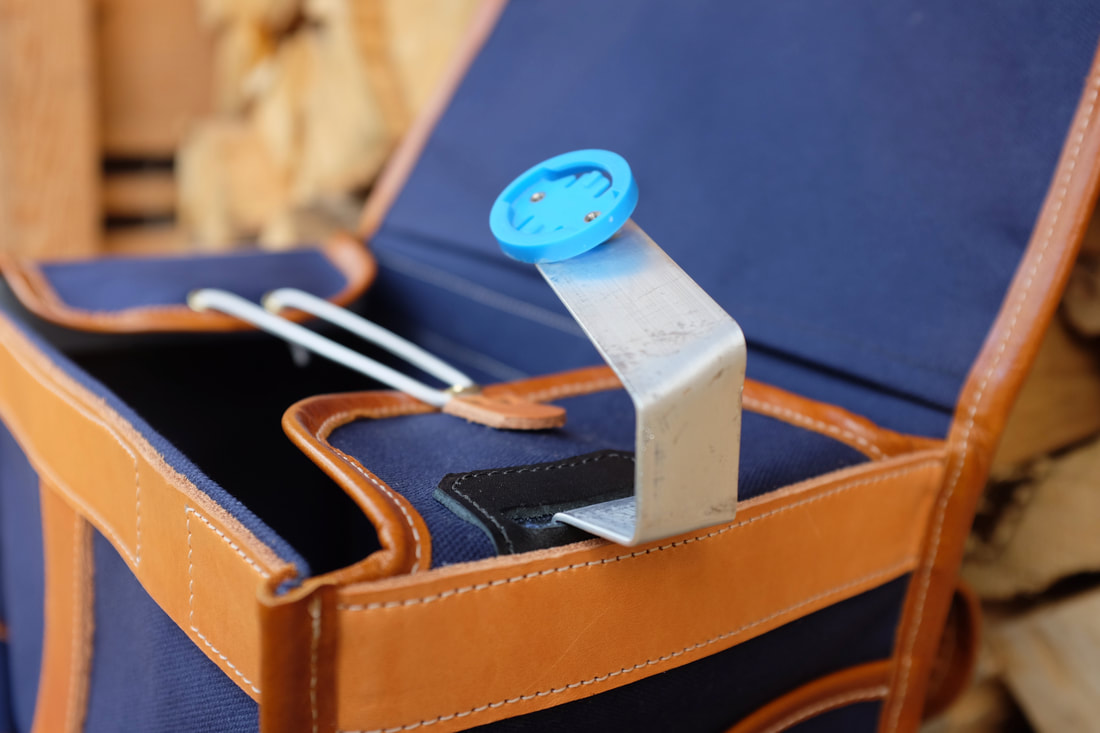 The grommeting route for the elastic closure works neatly with this side-closure arrangement with the benefit that it could later be reconfigured as a center-closure if so desired by only using the two grommets at the center of the top. For this reason I added a hook in the normal location--just in case. 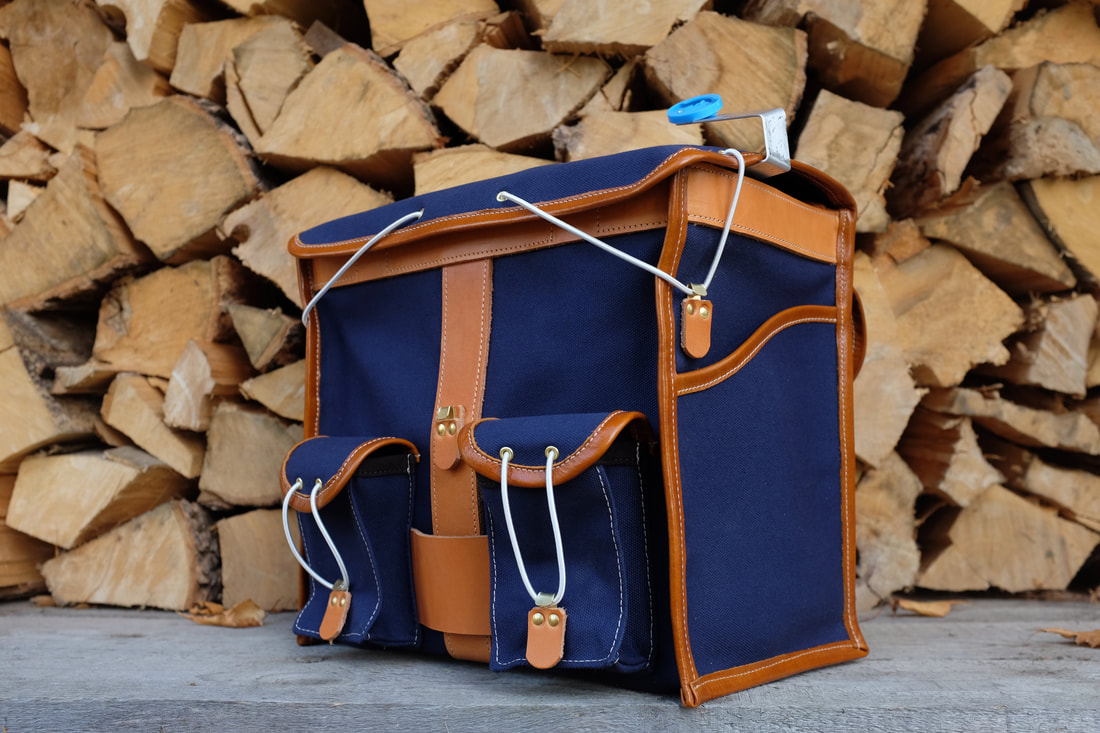 Routing ports are a satisfying way to keep electrical wires neat and out of the way. If wiring is an aspect of your bike set-up, keeping it organized and safe makes for a neater and uncluttered ride. This bag has a covered port in the base of the right-hand rear pocket to run a wire from the rack-mounted light to a charger stored in the pocket. With everything in place the bracket and the extension and the bag all fit together just as planned. There is enough lift over the bag cover that opening and closing the bag is easy, as is accessing the side hooks to close the cover. 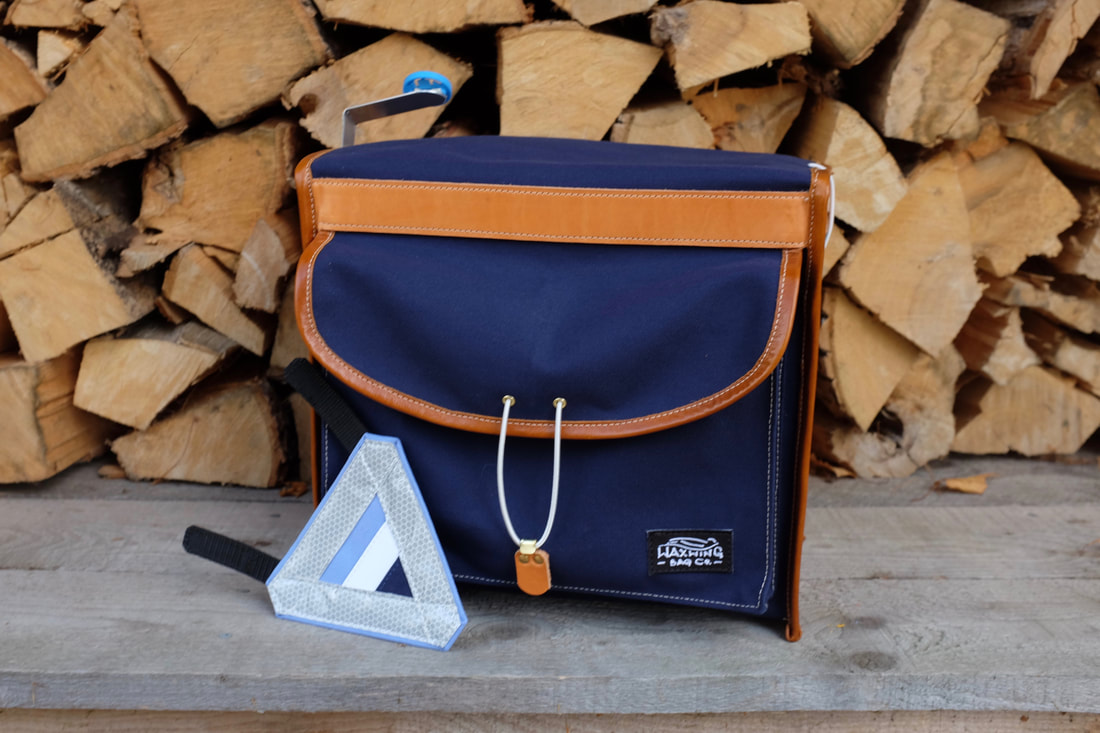 The bag specs noted a matching reflector--no problem!
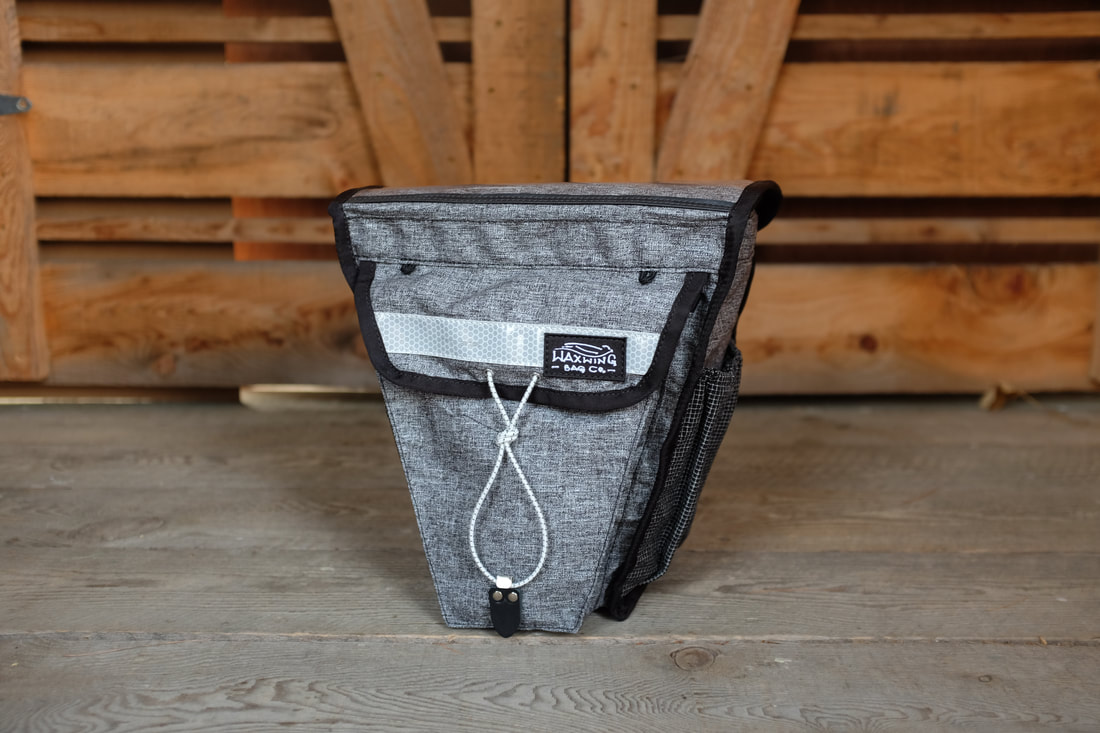
Every Waxwing bag is fully customizable. Sometimes the requests are small; say, a wire port for a charging wire in the bottom of the back pocket. Other times the scope is more comprehensive and requires a whole new bag design. Over the years I have incorporated countless requests and new ideas; pockets shaped around a headlight, a strap system for retrieving a laptop from an interior sleeve, connection points for custom racks, hidden openings containing shoulder straps, unusual pocket arrangements, straps to hold a pump within the bag, etc.. Are there customizations you’ve thought of that would make your bag more functional or able to meet your needs? Have you seen details that ought to be shared more widely? I’m always interested in expanding the possibilities that make our experience on the bike more efficient and better functioning to our needs. Reach out if you need a bag that’s configured to your specific needs. 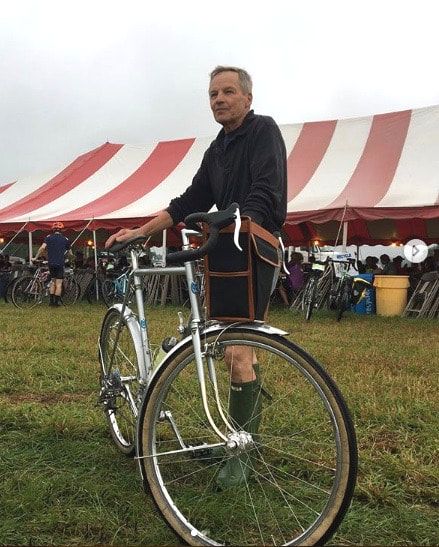 Photo: courtesy of Joe Kopera "New Bag Design..." read the email subject line from Peter Weigle. The attached photo showed a curious cardboard silhouette standing tall on one his fine front racks. “Would I be interested in making a bag something like this?” he inquired. “Of course” I replied, already curious about this new direction. The next image showed a bottle of milk on the same lovely rack, and then another with a bottle of wine. I wasn't sure what this was about as my curiosity grew... It was easy to see the elegance in his concept and I was immediately taken with the bold shape. And given that I always enjoy a challenge I wanted to know more. Intrigued, I let him know I was excited to be a part of this project. 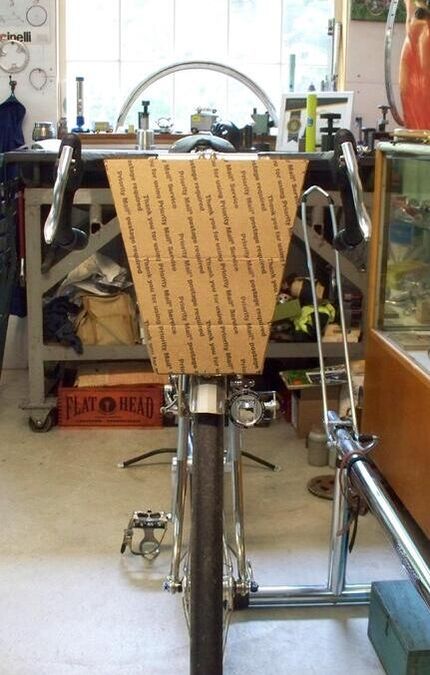 Photo: courtesy of JP Weigle “Could it be ready to test at D2R2?” came the next inquiry. “Of course” I replied, casually ignoring the tight timeline with a previously-planned vacation smack dab in the middle of it. We agreed to have it ready for it’s inaugural shakedown at D2R2 a few weeks away. Peter had a few ideas informing this design; his aim was to have a shape that lightened up the bag form visually and perhaps shaved a bit of weight in the process. Handlebar bags are commonly some variation of a rectangular box, and, when mounted, obscure the rack on which they sit. In contrast, the wedge shape allows the graceful lines of Peters racks to remain visible. The bag retains the area and usefulness of the map case found on a conventionally shaped handlebar bag. The shape informs function; lesser-used items such as the tool kit and spare tube sit at the bottom of the bag, keeping the weight low and centered in the small footprint. Jackets, food and other bulky, light objects go in the upper portion of the bag creating a self-organizing arrangement. The goal here was to pare down the form but not constrain the functionality. The bottle of milk would happily sit within the bag proving its usefulness for a quick run to the market. The design was soon referred to as the Sportif, reflecting its slimmed down sporty disposition.  Photo: courtesy of JP Weigle Peter is widely acknowledged as one of the preeminent constructeurs of our day; an artist whose medium is steel, silver and brass. To witness one of his bikes is to see a form reduced to its essence; an alignment of shape and purpose distilled into supremely clean, functional beauty. While he solicited my input and was open to suggestions, he’d already defined the profile that would become the new bag. Our job together was to refine the details. I translated the cardboard cut-out into a 3d SketchUp model which is handy to allow the customer and me the opportunity to look at the overall shape and proportionality while considering the relationship of the parts to make any changes when something looks amiss. 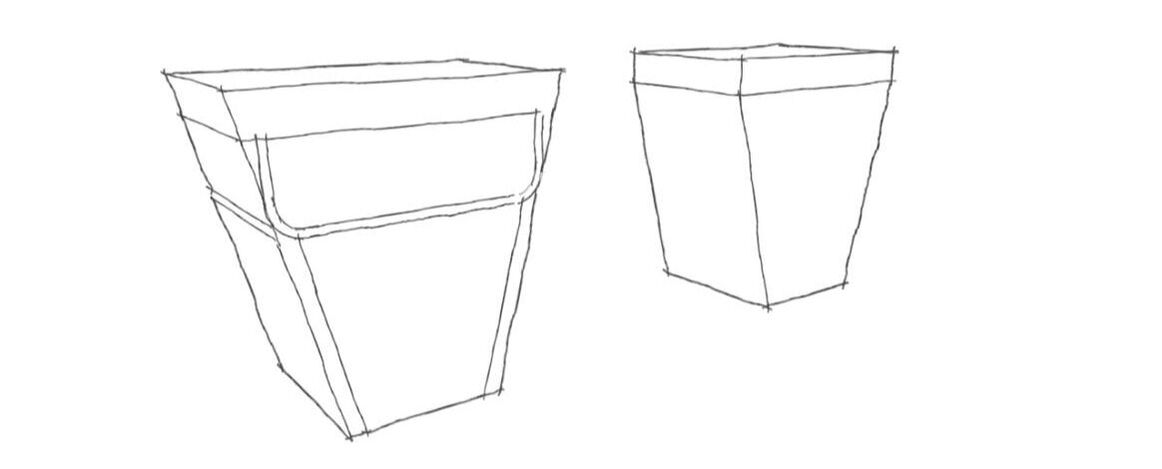 Questions were considered: Should we continue the tapered shape up to the very top (as seen above on the left) or bring the upper portion of the bag square where the leather edge band is located? What shape should the pocket cover be? Ought we try to make dimensional pockets on the sides? How deep should the bag be front-to-back? We had a productive back-and-forth with sketches, mock-ups and refinements. I experimented with creating a pattern for the tapered and pleated front pocket. To finalize the concept I sent Peter a mocked up front panel which provided a reasonable facsimile of the finished product without making the whole bag in case we decided to change anything. Peter hung the panel in place on his bike to give it a look. 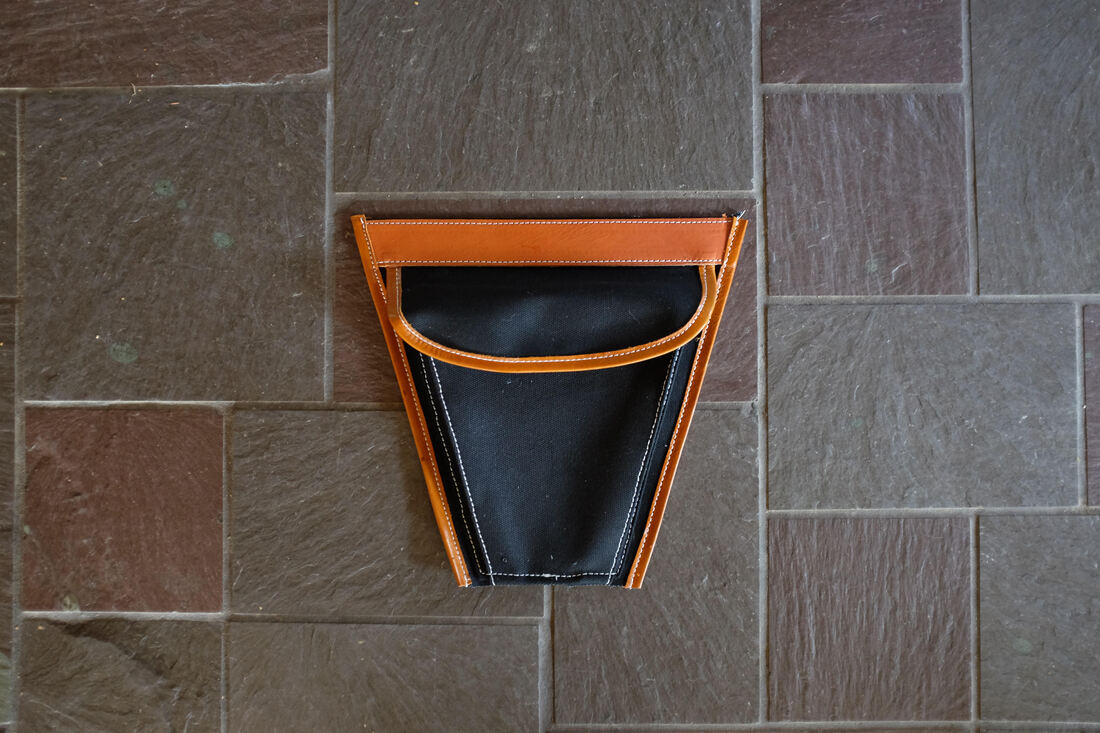 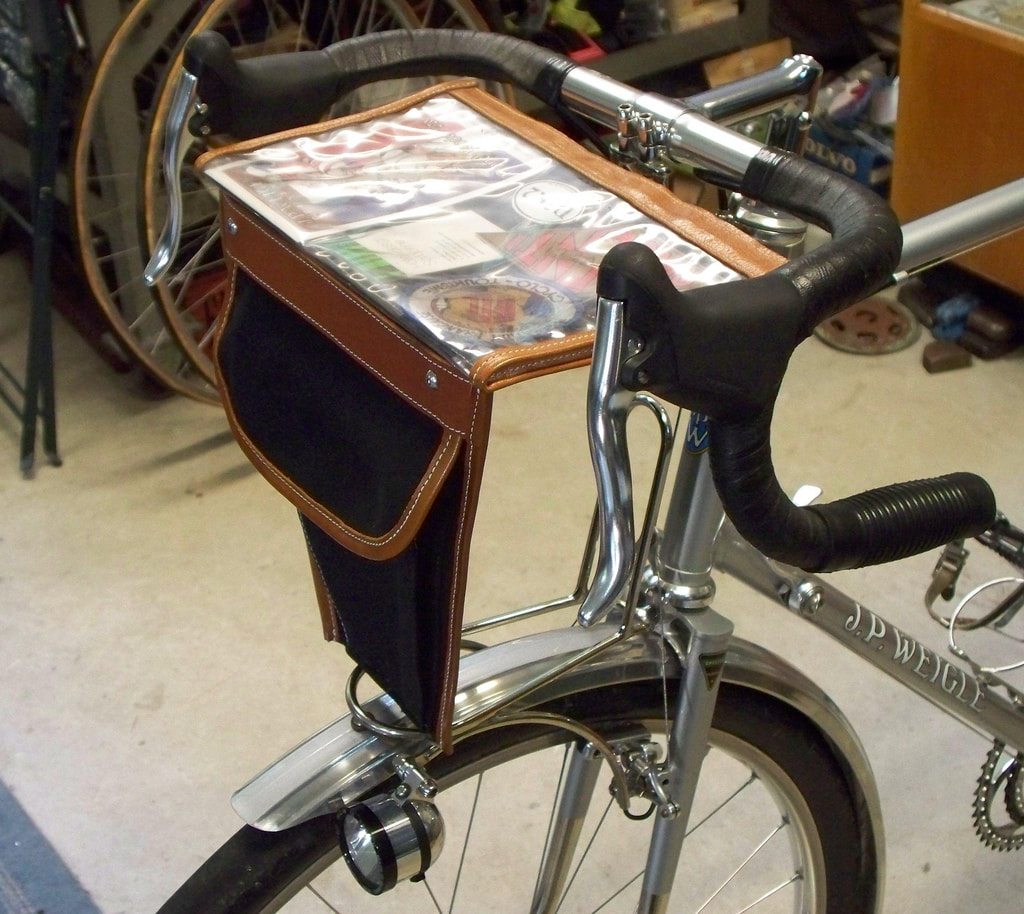 Photo: courtesy of JP Weigle With the design nearly complete Nancy and I went on vacation. Peter and I sorted out the last details via email as we enjoyed a tour along the St. Lawrence seaway in Quebec. We returned from vacation on Sunday, I made the bag on Monday and shipped it late that day, leaving Peter just enough time fit the bag and be ready to head to Deerfield, MA on Saturday. D2R2 is famous in the cycling world for its demanding, rugged climbs (and descents) through the wild beauty of western Massachusetts. If there were ever an event to test a bag, this would be it, and the shakedown ride was a great success. After the challenging ride, Peter was pleased with how the bag handled the rigors of the event and stayed in place well. Shortly afterwards he made a couple of changes; he moved the hook for the elastic higher up on the center band (it is always a challenge to find the perfect location for this detail!) and added two magnetic buttons to the top flap to act as an automatic closure system with the decaleur bracket. Peter has long used a small pencil case inside his handlebar bag and so we made him one for this bag with tapered sides to fit appropriately inside the shape of the Sportif. It rests at the top of the back panel for quick access to small items while riding and is held in place by the decaleur mounting bracket mounting bolts. This little bag-within-a-bag is particularly useful with this design since there is limited exterior pocket storage. 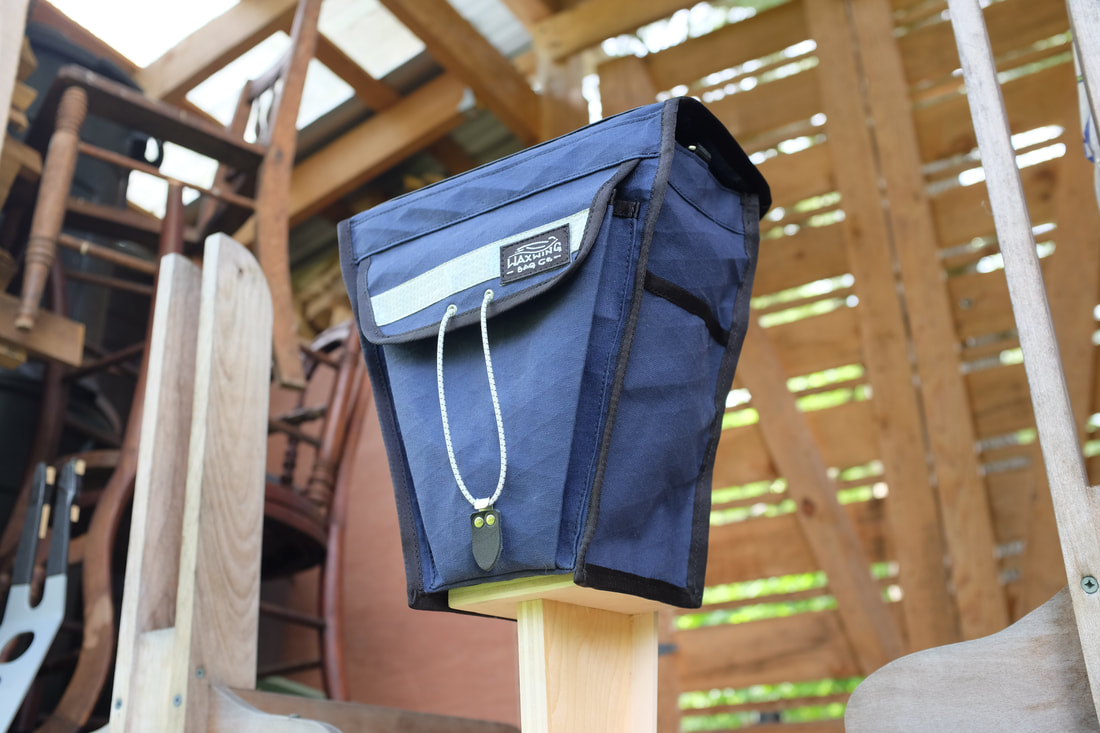 Short of a full handlebar bag the sportif is perfectly suited to many (if not most) daily excursions. I’ve since made this bag in three different heights, the same as my regular handlebar bags, 8”, 9.5”, and 11”. I was curious to see if the shape maintained its attractiveness in shortened versions (Peter’s design is 11” tall) and I am glad that it translates well. Versions have included ones made of Dyneema and xPac, and one requiring a special sleeve to work with the unusual backstop found on Jack Taylor racks. You can order a Sportif here. The 8" version can also be configured to mount rackless--attached to the bars and supported by adjustable cord to the hoods. A few variations are shown below.  Photo: courtesy of JP Weigle Peter periodically posts pictures of rides around his rural Connecticut home. I’m always proud to see the bag we came up with, it looks elegant and at home on his bike; both familiar with its traditional styling and yet strikingly uncommon. It was an honor to get to work with him on this project. 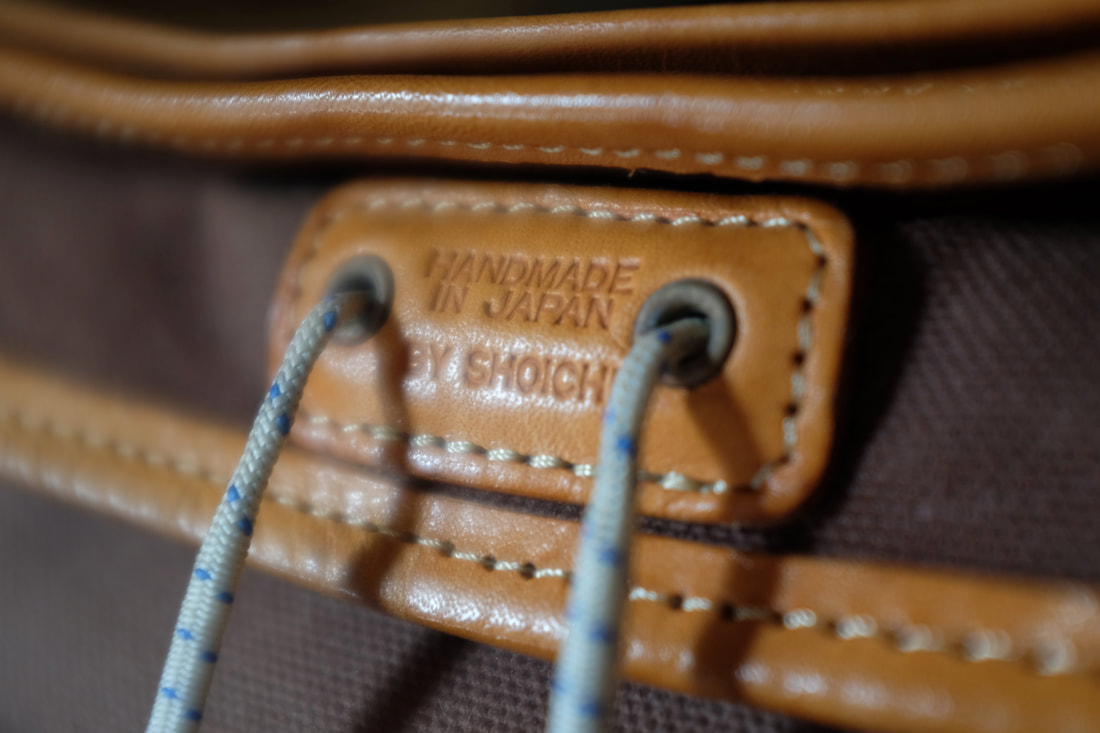 This is a story of unexpected confluences. I read in the most recent issue of Bicycle Quarterly that esteemed Japanese bag makers Shoichi and Tomoko Watanabe planned to retire at the end of July, marking the end of many years making traditionally styled bicycle luggage in their Tokyo shop. Having long been enamored with their work I was filled with a feeling of gratitude for their craftsmanship and creativity. No sooner had I read this, than two different customers came to me with circumstances that a Guu Watanabe style bag would be just the solution for. 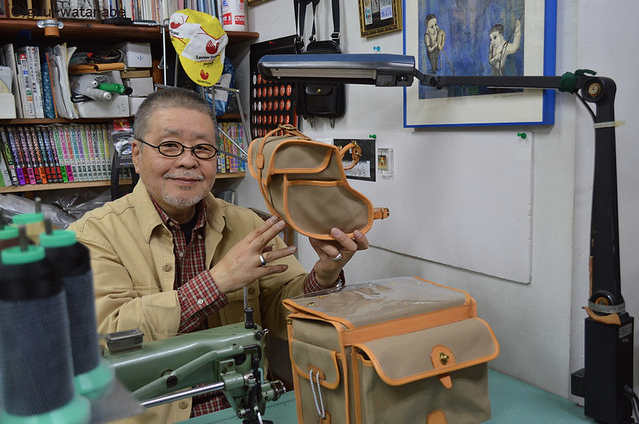 Shoichi Watanabe at work (photo credit: guu-watanabe) Years ago, as I began making bags I scoured the Guu Watanabe Flickr photostream. Their process was a source of wonder; to see their endless variety of bags, what tools they used, their templates, colors and configurations. I tried to pick out their techniques--did they use edge binders? How did they cut their leather? Their work became an example to me, even if I had far far to go in developing my skills. Doing my best to learn however I could I found myself pouring over images of these Japanese masters on the Internet. If that's what you have to do, then you do it. I gleaned all I could from peering into their shop from half a world away. 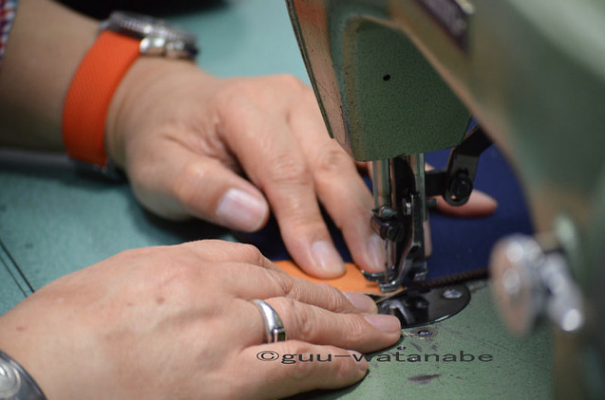 Peering over Shoichi's shoulder (photo credit: guu-watanabe) Here's where a bit of confluence comes into the picture. Shortly after reading that Guu Watanabe would close, I had two different customers come to me with set-up constraints that would be well addressed by using a Guu Watanabe design. In both cases the projection of the stem reaches out farther than the connection point of the backstop on the rack. This offset means a conventional rectangular bag shape would be contorted between these two points since the stem/decaleur would force the top of the bag forward of the backstop where it is connected to the rack at the backstop sleeve. A little tension here is okay, but not too much. 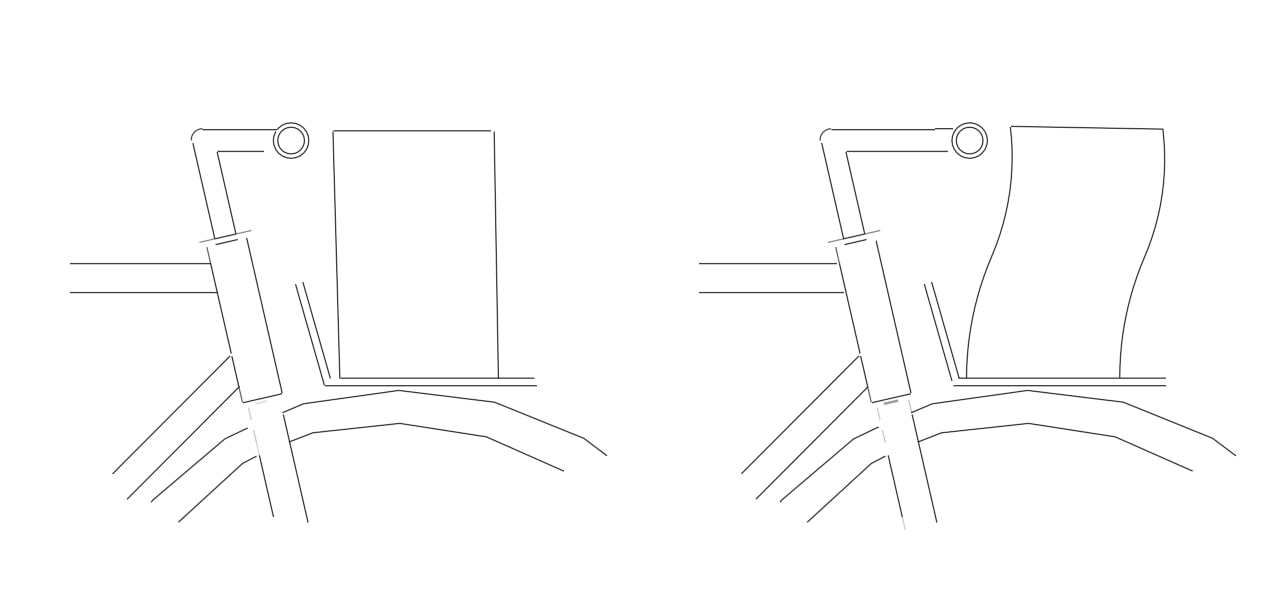 Shoichi had a solution for this scenario and I passed on a sketch to both of these customers suggesting his design as a means of accommodating the constraints of their set-up. 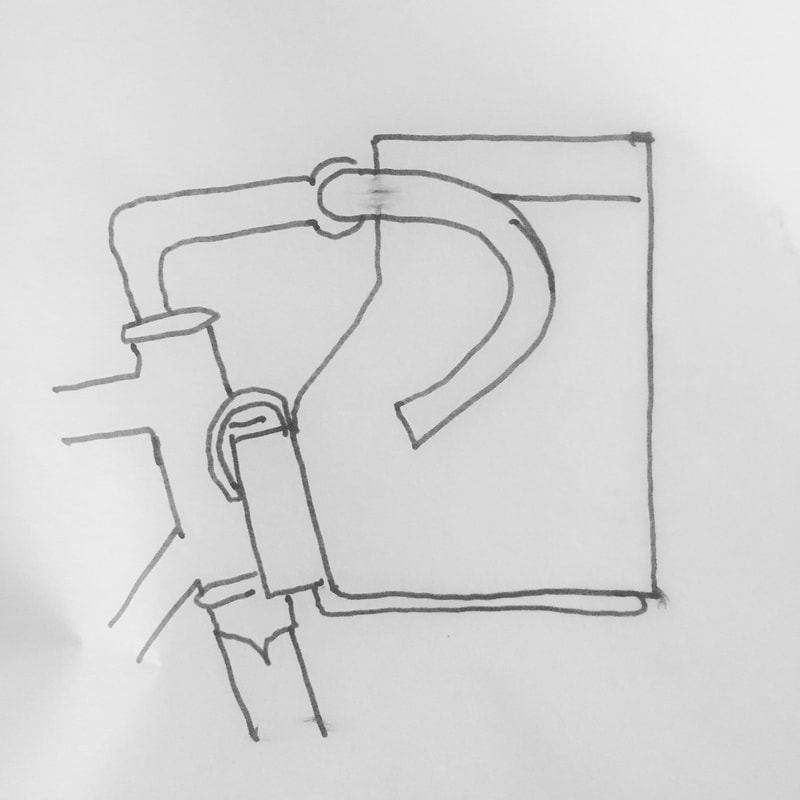 See how the side panel expands rearward in the bottom half of the bag? This is a feature of many Guu Watanabe bags; not only does the bag shape solve the offset issues presented by the stem-rack alignment issue shown above, but it also adds some capacity within the bag while tilting the rear pockets a bit outwards towards the rider. Both features are potential benefits, depending on the needs of the rider. I look forward to implementing this design when the opportunity presents itself. 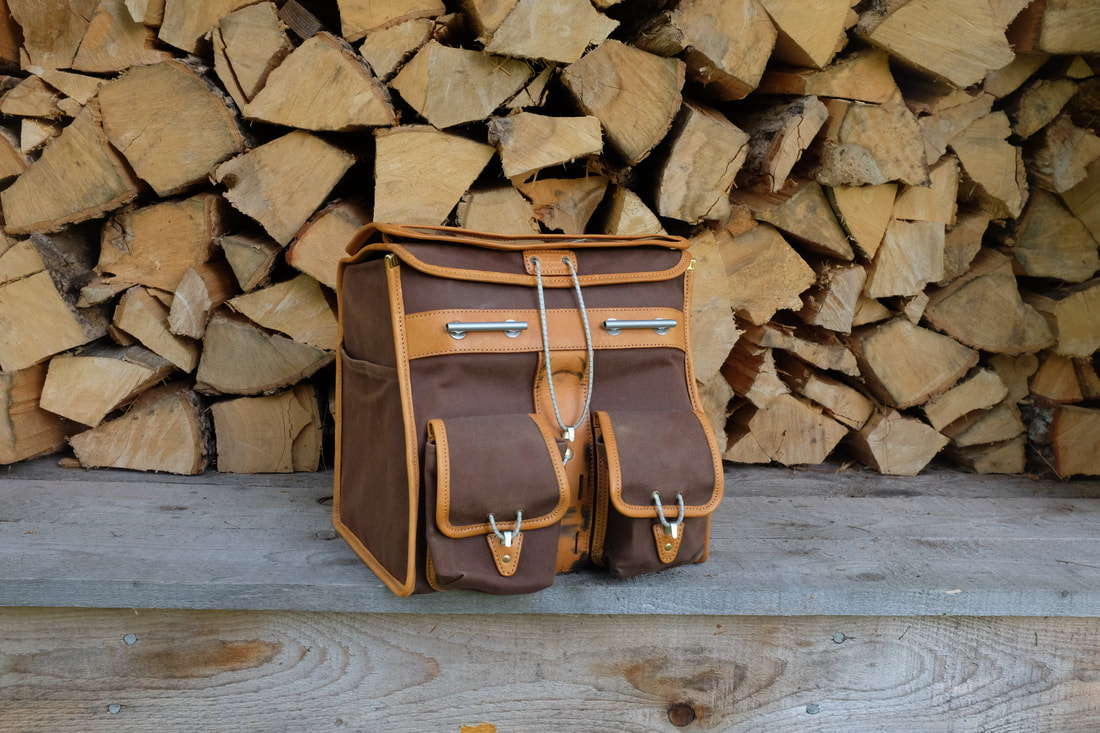 As chance would have it, a recent customer took note of my Instagram post about this bag design being a useful solution in certain circumstances and offered to send his Guu Watanabe front bag for me to take a look at it. How about that? I’m a bag geek through and through and always welcome the opportunity to examine, evaluate and understand the designs and work of others, so I was so excited to receive this bag in the mail. 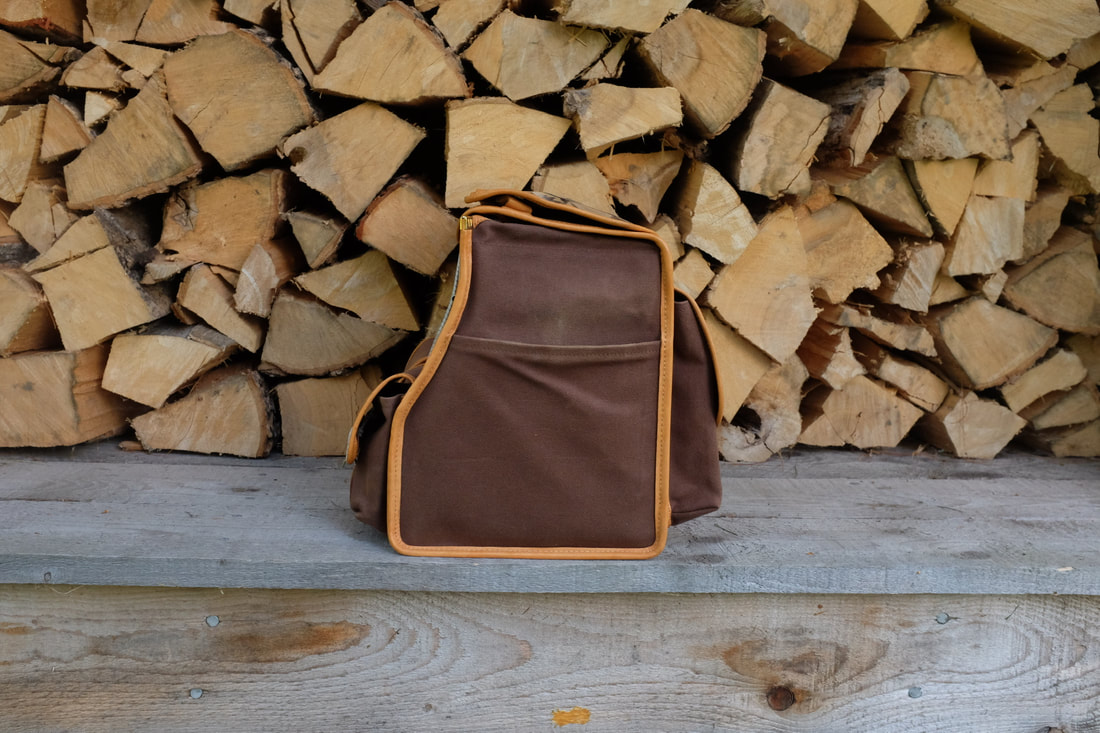 The bag is a wonder to behold. What strikes me first and foremost is the overall shape: it's so bold and distinct! The canvas is super stout and the details are highly specific to Shoichi’s work. The stitching is flawless and the leather is rugged. I took note that he sews a fabric cover to his internal stiffener, a detail I’ve never seen before. He also constructs the bag cover with side gussets that limit how far the top opens and also potentially keeps any water out that might come in from the sides. Somewhat curious to my eye is the snapped down map case; it’s not removable but it can be unsnapped and stood up. I’m not sure what this feature achieves, but it’s interesting to see nonetheless. I count myself lucky to see this bag up close. 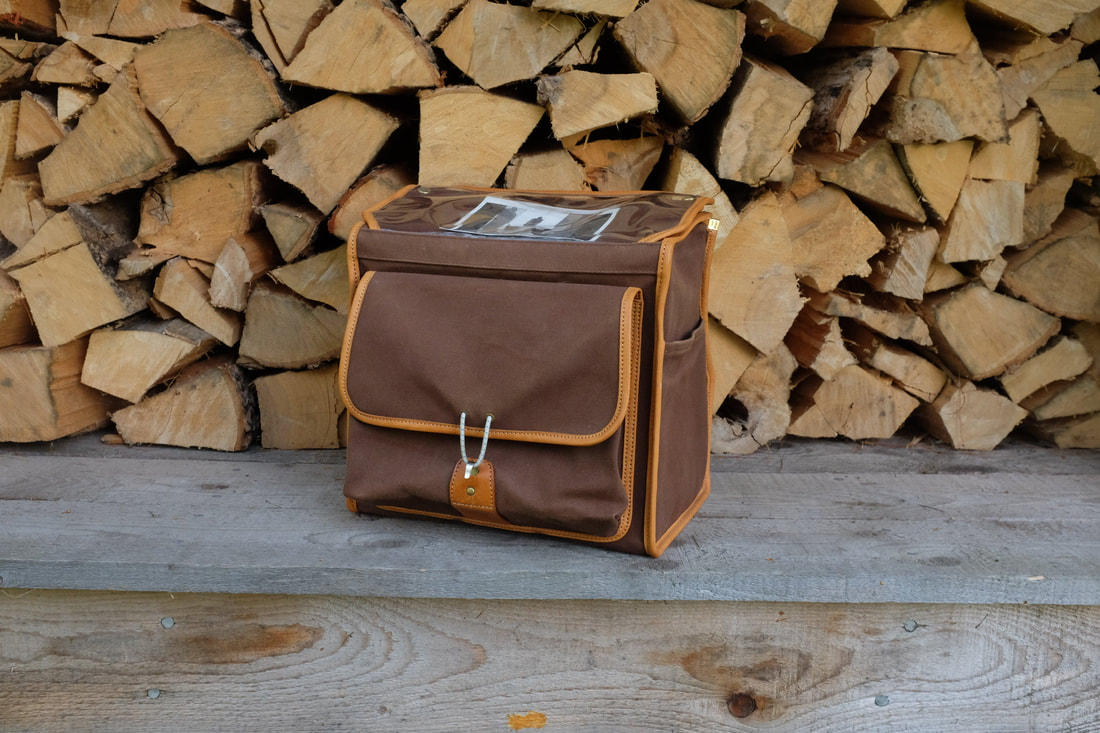 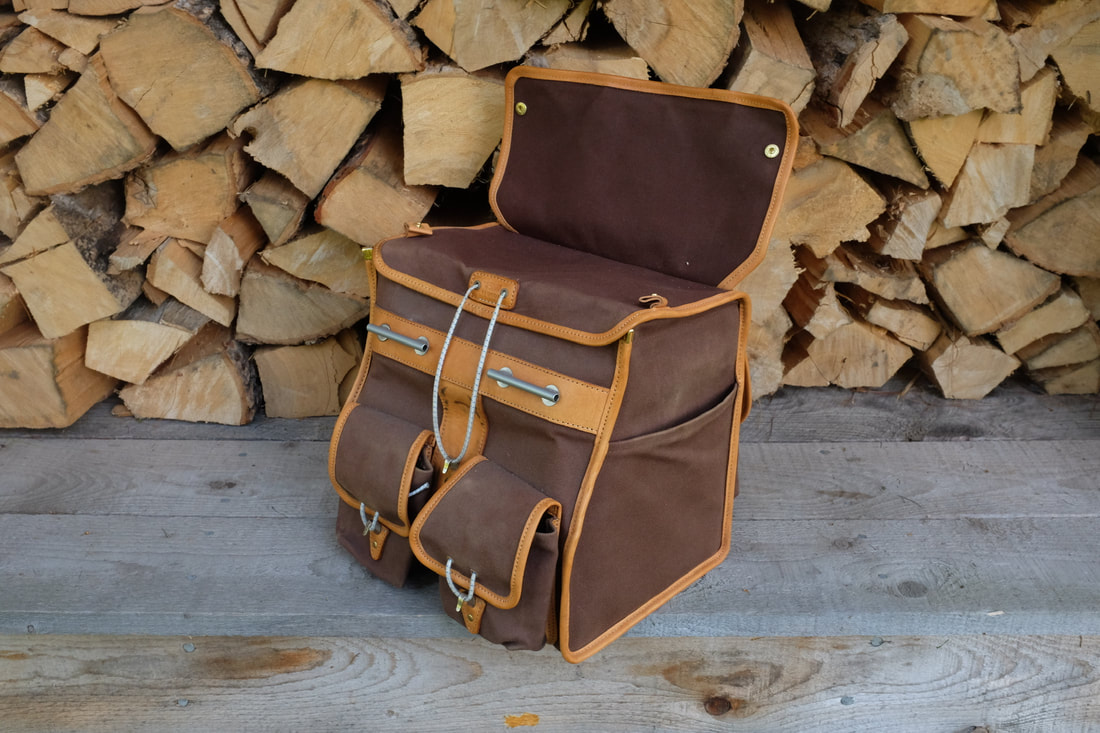 I am sorry that I did not get the chance to meet Shoichi and Tomoko at their workshop when we toured in Japan in 2017, but I am grateful to have had the recent opportunity to see a small bit of their work in detail. Before returning the bag, I plan to make a template for future reference and might just have to make one for myself, if a customer doesn’t ask for one first.
There’s always more to see and learn within this work.  2021 Blog Update: Since first publishing this post we've updated the Medium Rackless for improved access: the bag cover is now secured via side closures based on customer feedback. See this improved detail in the photo above. I am pleased to introduce our new medium sized Waxwing handlebar bag--designed to work with the Rixen & Kaul/KlickFix handlebar mount system. This is a perfect solution for riders who want carrying capacity without the complications of racks and decaleurs. Most “handlebar bags” would be more accurately called “front rack bags” since they almost always rely on a small rack to support the bag; no doubt a legacy of the days when two straps was a complicated as it got. This is a true handlebar bag. 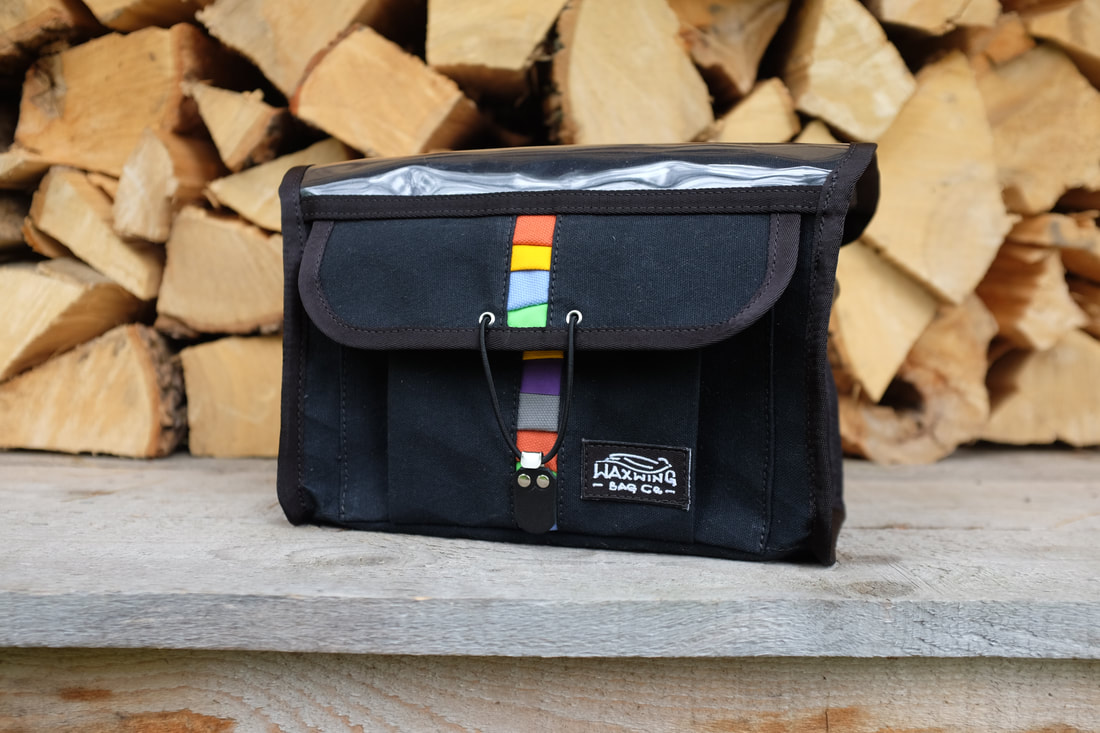  This innovative bag/mount combo is great for the essentials; it provides storage for all you might need on a day out or on your commute. It is similar in size (and intent) to the Mini Front Bag, measuring 5” deep x 6” high and 10” wide—about 2.6 liter capacity. The bag has extra space with the expandable pleated front pocket, and encourages organization on the inside with two internal mesh pockets on the sides and one along the front. Two D-rings allow off-bike portability and a map case completes the package. The cover and front pocket are closed with elastic cord and hook.   One might quibble that this is not technically a rackless bag since it uses the KlickFix mounting bracket, and that’s a fair point, but it's an easy and accessible set up for almost any rider and about as paired down as you can get for a bag of this size. The bracket connects securely to a KlickFix handlebar mount, centering the bag in front of the bars. The bracket is generally meant to stay connected to the bag yet can be removed when necessary. With this arrangement the bag is suspended which minimizes the need for stiffeners to support the load.  Conventional racks have their place for sure, but this set-up is lightweight, secure, easy to use and quick to install. The bag is a great choice for anyone looking for a moderate load capacity and a pared down aesthetic. Also, if you purchase a second handlebar mount, you can move the bag from bike to bike in seconds. You can order the hardware separately or order through me. Note: Klickfix recommended weight capacity is 15 pounds and you shouldn't use this set up for demanding off-road use, and its important not to overload the bag with too much weight. For heavier duty use, consider a conventional rack with the same bag configured for that use. As always, customization is readily available when you order a Waxwing Bag and there’ve been some fun variations already with this bag. What are your colors? Available in canvas, xPac or waxed options.
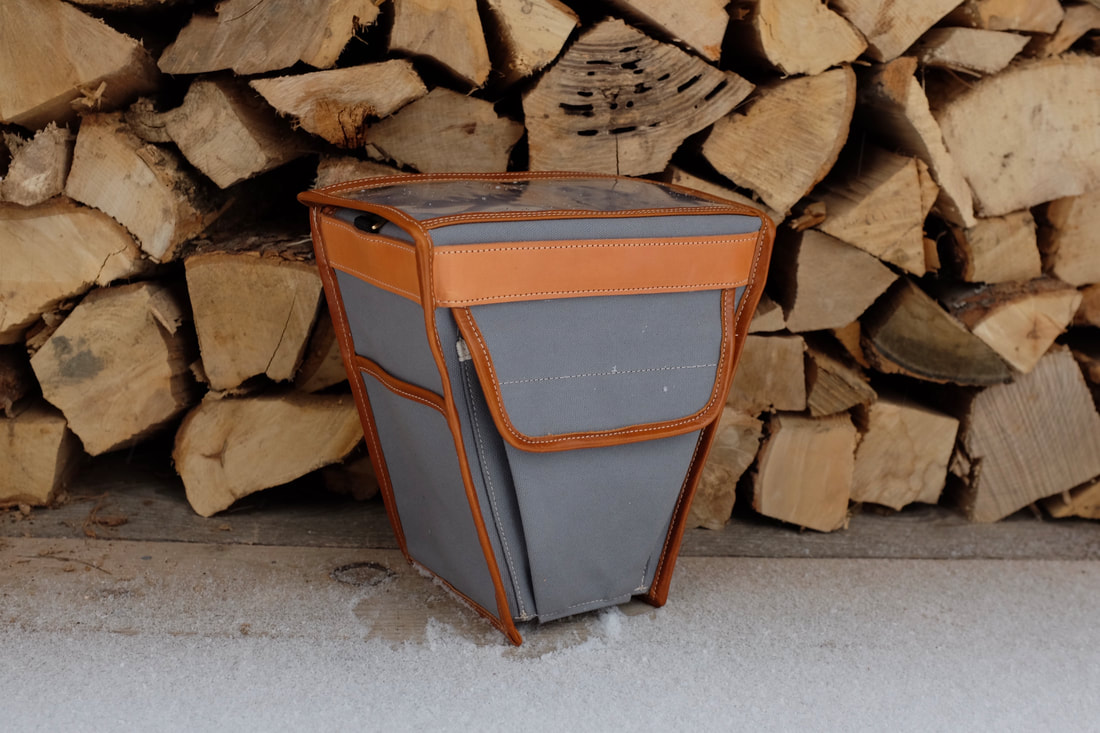
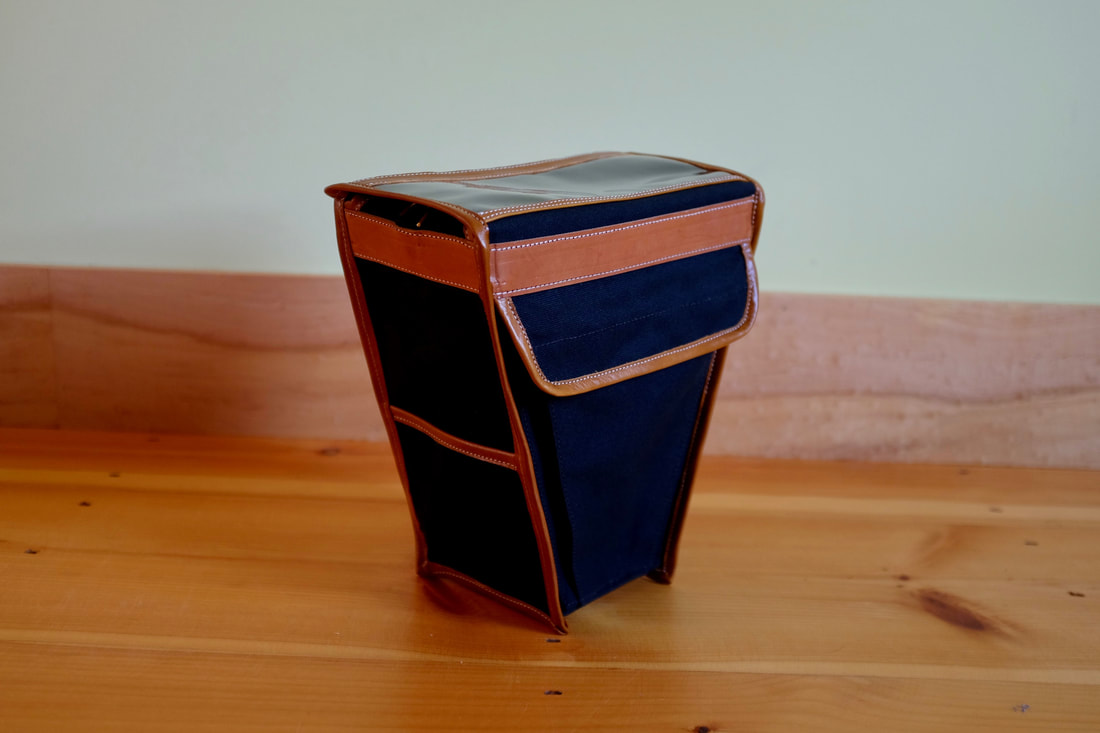
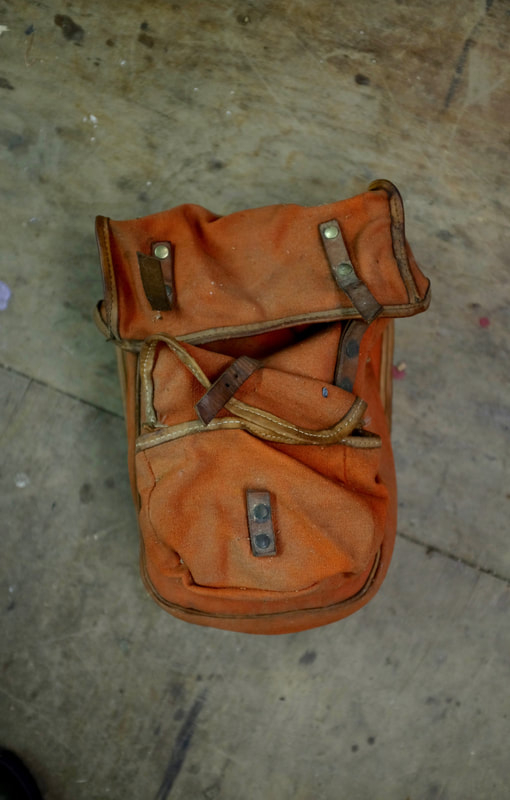 Imagine my wonder when I came upon this aged and worn bag in a remote North Carolina workshop. My mind swirled with a mix of admiration and curiosity. The bag evoked in me regard for the skill, design, and care in its creation, but also amazement in discovering it was made a couple towns away from our home in Vermont forty-five years ago. I had to know more! Making traditionally inspired bike bags isn’t exactly a common avocation, particularly on the quiet backroads of our rural state. How I found myself holding this bag on a misty January in that workshop is a long story, but I am proud to say that you’ll be able to read the whole tale in the 2020 Summer issue of Bicycle Quarterly*. Two winters ago I had the honor of spending a day with noted framebuilder Roger Jansen, who did his work under the name RT Jansen. Roger’s story is a tale of a man who believed in active, engaged learning and was willing to go to great lengths to pursue his craft while forging a life and education for his family. 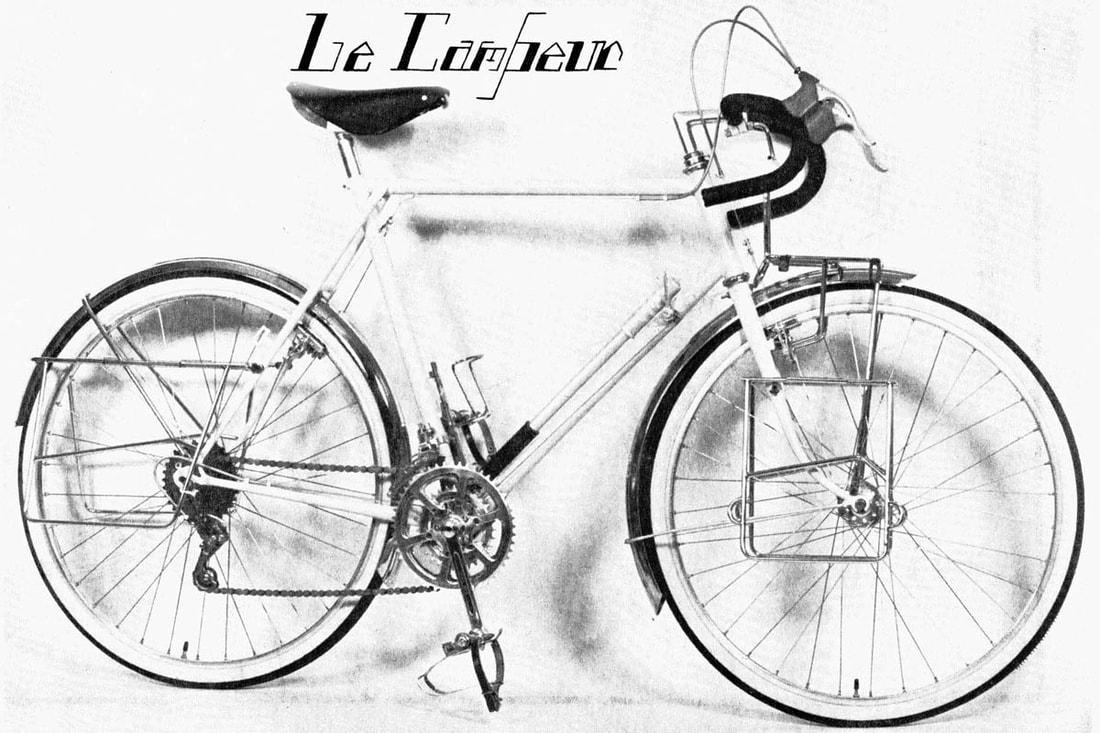 The Le Campeur offering from the RT Jansen catalogue Most of the components and parts required for the bikes Roger made were imported from France, including bags, but at some juncture decided he would offer bags for his customers as well as the bikes, and he would make them himself. This would be a logical extension of his work since his bikes were envisioned as touring-ready machines complete with racks and decaleurs. In those pre-internet days, I imagine it would have been hard to even know where to find accessories like bags that would be appropriate for a bike like this. I suppose some general purpose nylon bike bags would have worked fine, but they wouldn't have, you know, made sense with a carefully conceived French-style touring bike. There’s no point in getting almost there with a concept and then diminishing it with the wrong bags. 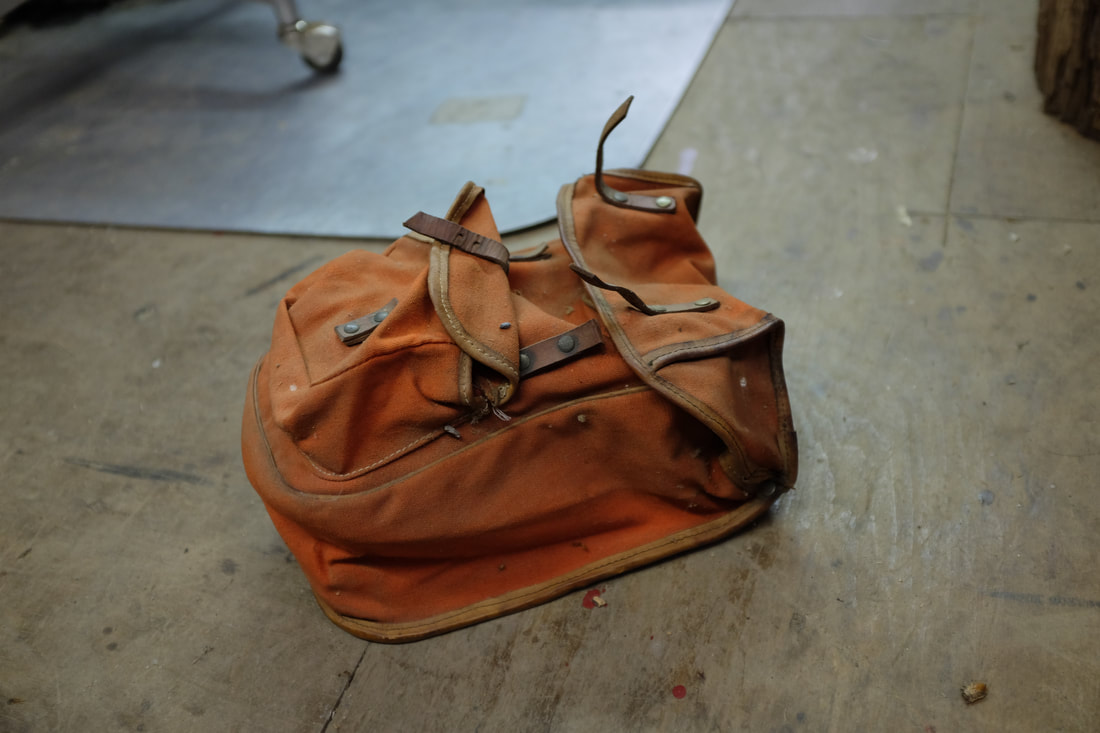 So, the bag in my hands. Its small pannier in deep orange with brown leather trim. Having worked for years to refine my skills and improve my process, I could see that Roger had really thought through his approach and was able to produce an impressively well-done bag. Was he working from an example? How did he land on this design? Like any building process, you may have a design or pattern in hand, but it is the repetition that refines and improves the result. I think of making a Waxwing bag a bit like solving a puzzle. Sequence, shape, adjustment, intersections, shortcuts and technique all converge to produce a quality outcome. Decisions are made, avenues abandoned, and sometimes the solution to the puzzle take a while to figure out. Roger clearly had a mind for this. 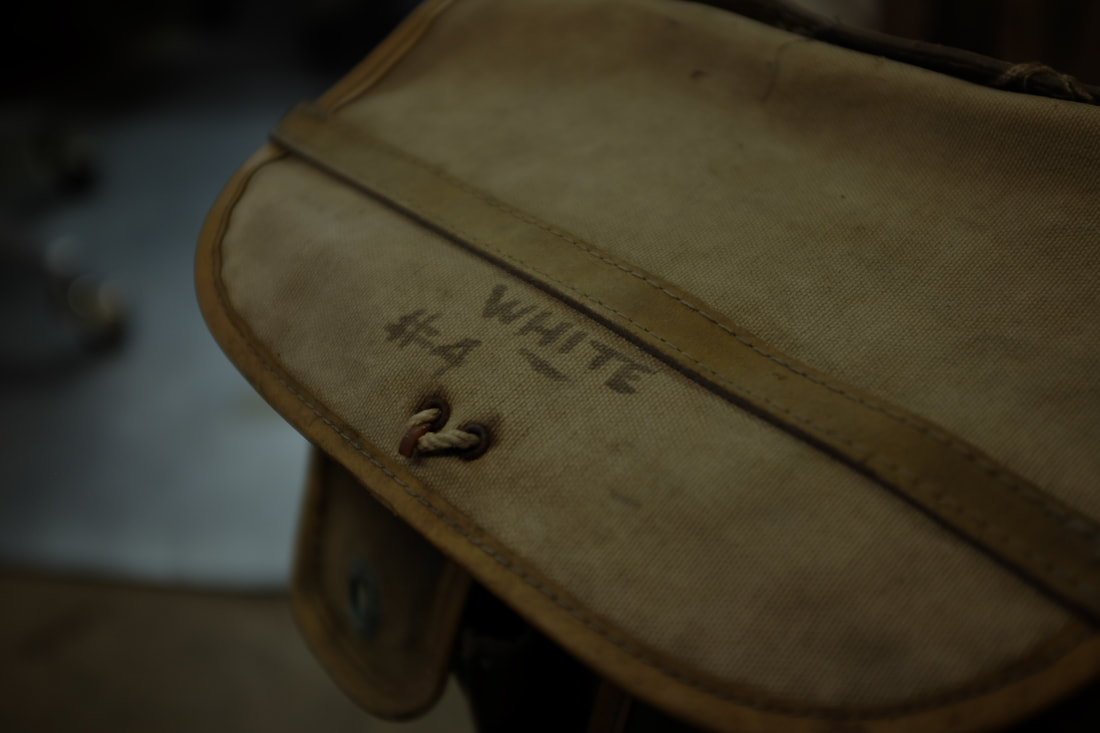 Among Roger's collection from his bicycle days was the handlebar bag of his friend Sumner White. I suspect this was produced by Sologne or TA I was moved to think of a craftsman intent on his effort, working outside the mainstream, maybe even a little against it, in pursuit of his vision. Seated in front of the sewing machine, making panniers to accompany his newly completed Routens-inspired touring bicycle. I feel inspired picturing Roger engaged in the same work decades ago. Since we no longer live in a world of guilds or traditional apprenticeships my avenue into this work has been solitary and at times hard-won and I’ve often daydreamed about where and how I might have learned from others--sometimes I still do. Roger may have had a similar feeling. He did great work. It is one thing to master the myriad skills required to build a complete constructeur bicycle, and it's yet another to take it to making bags. Since we met Roger has consistently made a point of complimenting my bag-making work. Perhaps what he’s seeing is someone, like him, who has dedicated his life to craft, to making, to the work required to hone a skill, and who combines the production of goods with the deep satisfaction that comes with making as its own reward. I’m so glad Roger’s little-known story will be shared with the broader bicycle community. *Bicycle Quarterly is available by subscription and at select bookstores and bike shops Postscript: 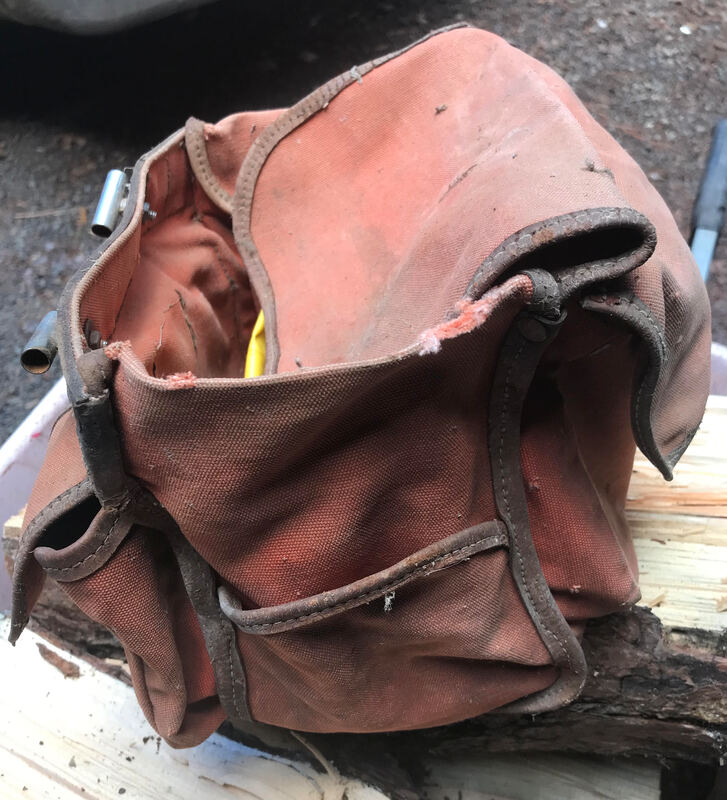 I was delighted to receive a note from Roger's son Larry with this photo attached of a matching handlebar bag that went with the panniers. Larry said he snagged the bag from his dad in the 70's and has been using it ever since. He said he'd forgotten that it was once part of a full set his dad had made. I wonder if theres a picture somewhere of the whole set together on one of Roger's bikes? That'd be fun to see!
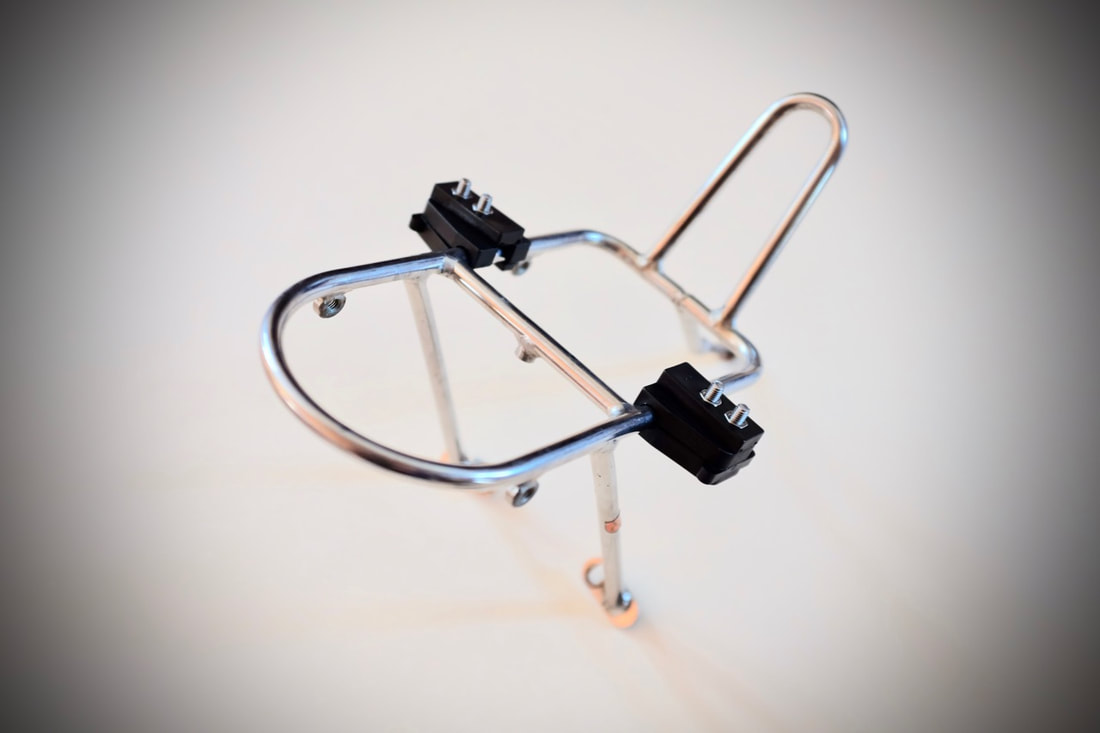 Do you ever struggle to keep your handlebar bag steady, stable and secure atop the front rack? Do you wish it was quick and easy to remove, yet more firmly in place while riding? The intersection of the bag, the rack and the decaleur is a work in progress in need of improvement. This important task can be a challenge to achieve. Almost all elements of a bike are precisely brazed or bolted in place, but not our bags. Most riders find it handy to be able to remove their bag, ideally with little fuss and yet make it reliably secure for all the bumps, twists and turns encountered while riding. The flexible quality of fabric plays into the equation along with bag size, cargo weight, and loading choices. For many years I relied on velcro straps to hold the bags I make to the rack with reasonable success, but that was never completely satisfying. Now I do my upmost to talk customers out of velcro straps...  There is a better solution. RaClips are now available from Waxwing Bag Co; they are quick-release clips that attach to the bottom of the handlebar bag for a secure hold on the front rack. These handy clips quickly and reliably attach the bag to your rack while remaining discretely out of view. As long as you have 1 1/4" length of clear run on tubing (up to 5/16" diameter), you'll be all set. What's so great about these is the ease with which you can mount your bag and engage the clips. There's no crouching over trying to fish velcro straps over tubes; there's no worrying as you watch your bag sway from left to right as you round corners; you just drop the bag in place on the rack, reach under to feel the retention clips then slide them into place. That's it. When it's time to remove the bag, simply reverse the action and the bag is free. 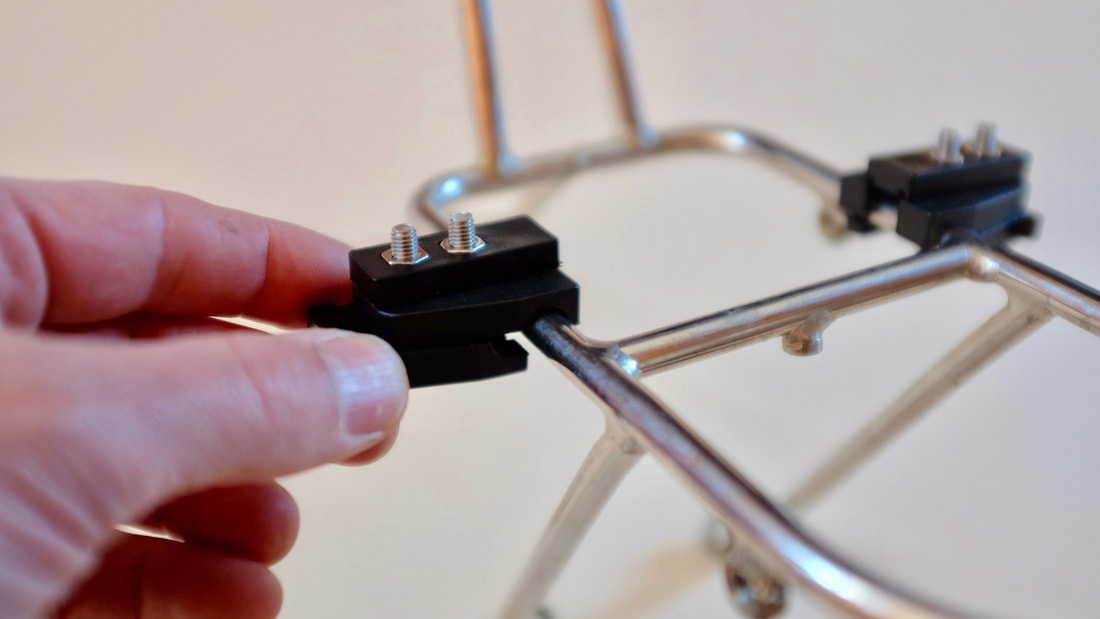 For a small bag like the Waxwing Mini Front Bag, you may find that RaClips --in conjunction with the backstop sleeve-- are all that are needed to hold your bag in place, You'll need to be the judge based on your riding style and typical cargo. For larger bags, RaClips used in conjunction with a decaleur, such as the Dock-It™, and the backstop sleeve, create a nicely triangulated retention system that's easily accessed and simple to use. Depending on how much you want to limit movement, you can mount the clips through the base leather of the bag, add a flat piece of coroplast or plastic to match the interior footprint of the bag, or acquire a full bag stiffener that extends up the interior sides of the bag. RaClips can be added to any bag. ABS stiffeners come as an option with our standard bags. To demonstrate this system, I created an "invisible bag" out of plexiglas and made a brief video to show how it works. The second video shows the same process with an actual bag. 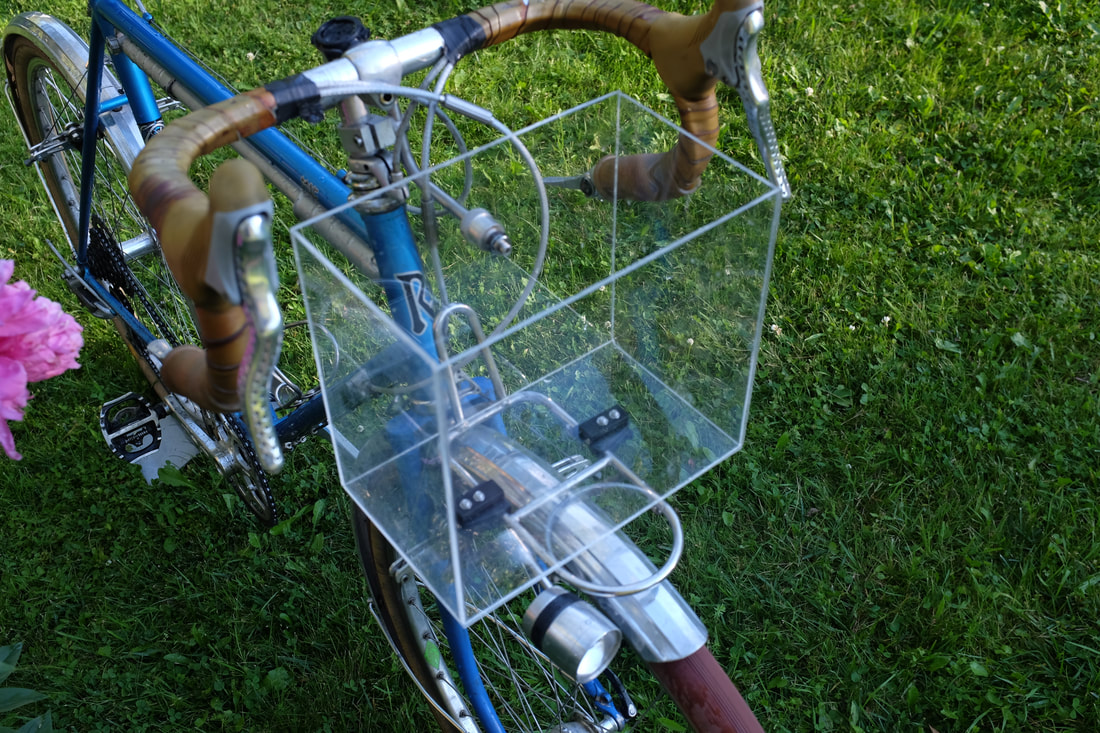 RaClips are available in the Waxwing Bag Co. store--free domestic shipping included. Installation instructions are included.
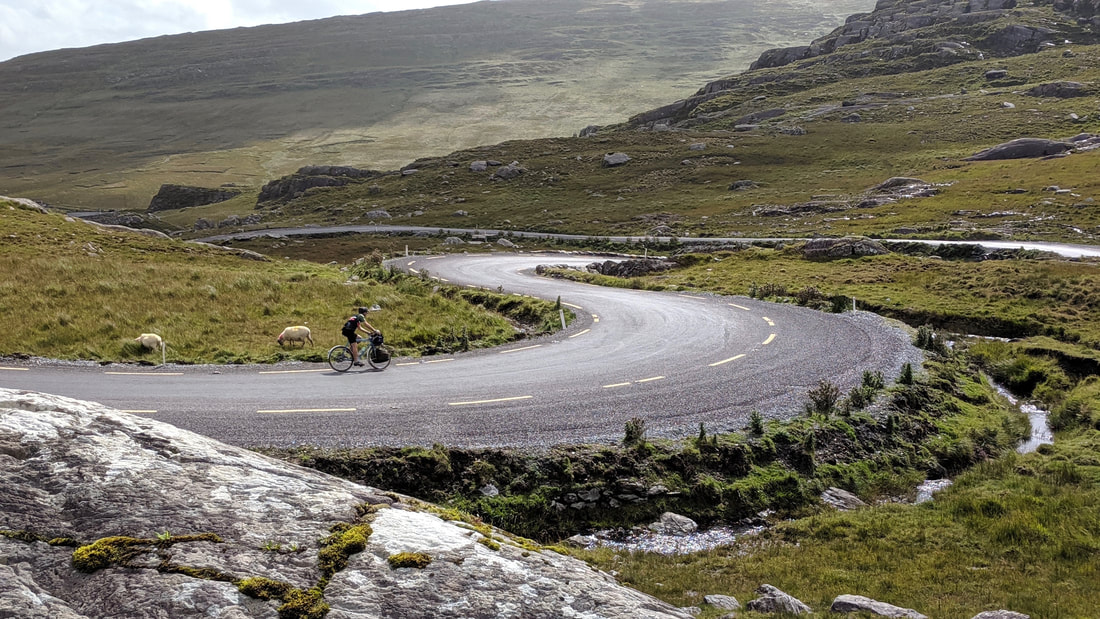
Please be in touch about RaClips or any other custom or standard bag needs you may have in mind. I look forward to working with you to create the right bag for your needs. 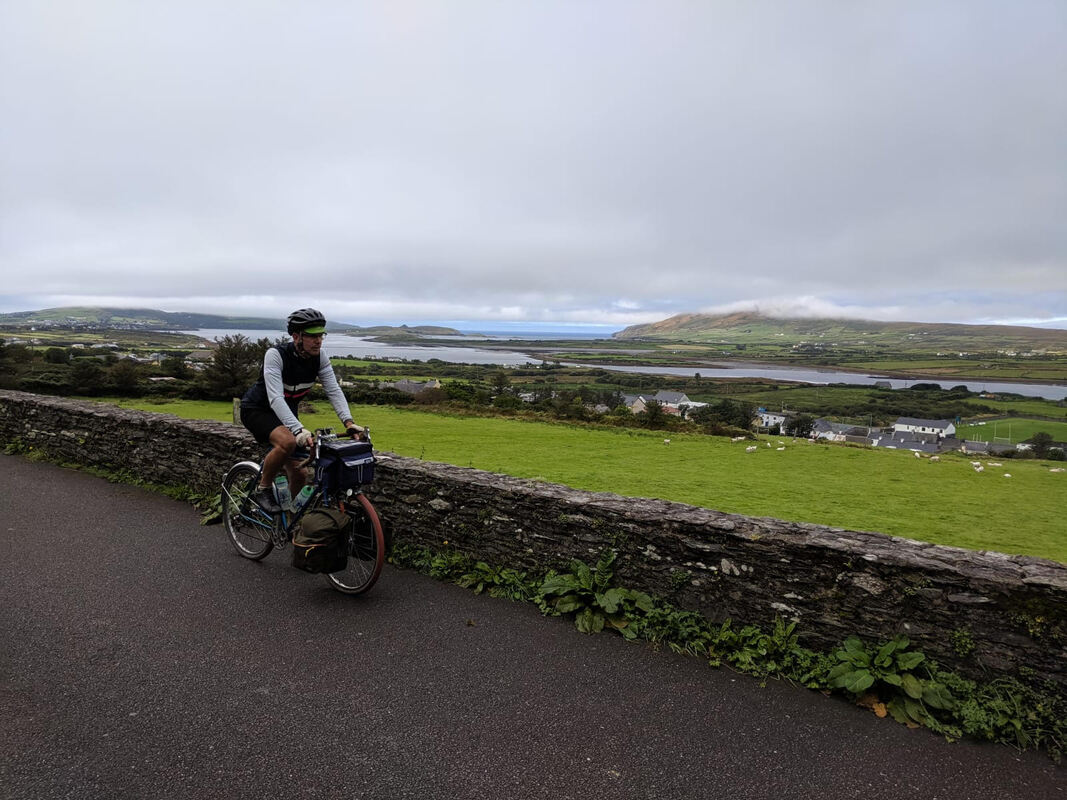 We recently enjoyed a cycling journey through the mountains and peninsulas of County Kerry in southwest Ireland.
This was an excellent opportunity to try out my new xPac x10 handlebar bag and a set of roll-top panniers. We do lots of rides locally and make occasional longer trips regionally, but rarely do we get the opportunity to use our bags day after day for nearly two weeks. Both performed great and I was grateful for the hard test they received. Making and using are two distinct aspects of bringing a bag to fruition and its important to get that immediate feedback that extended, repeated, hard use can bring. My handlebar bag is a medium size and has the optional exterior side-pocket feature that I really appreciated. As the saying goes: A place for everything, and everything in its place. This is easier when you've got lots of pockets to keep things sorted and I was able to access food, clothing, electronics, wallet and other items quickly and efficiently. Tools were housed in a matching tool roll in the front pocket and that system worked well. If I needed anything I knew just where to go and the tools were easily accessed from the roll. Likewise, the panniers were great--this was my first time using roll-top bag and I really liked them for the quick and easy access they provide. The roll-top also creates a nicely adjustable storage space that accommodates greater or lesser amounts of stuff. The back roads of County Kerry are frequently lined with blackberry bramble and there was a certain amount of brushing up now and again when we had to move to the side to make way for a passing car or to lean over for a few ripe berries. Despite some abrasion, the bags did fine. I suppose that's the periodic hazzard of low-rider mounted panniers. We traveled with a friend who used mostly bike-packing style bags and he was certainly hampered in mounting and removing his bags whereas my bags were simple and quick to mount. My handlebar bag employs the combination of a Dock-It™ decaleur and a set of RaClips, while the panniers are held onto the rack with the traditional hooks and bungee. Our friend also struggled to pack easily because the small bags required care to fit things in while having the big spaces of the handlebar bag and panniers allowed easy and quick packing. As long as all the pocket covers were hooked in place, I was completely confident in the stability of my bags and the only time anything went awry was when I laid the bike down on its side the panniers had a habit of unhooking from the top bar of the racks. Despite being a minor annoyance, I'm contemplating a solution to keep this from being an issue. Likewise, I find the elastic/hook pocket closure to be simple and effective, but I'd love to figure out a system that almost closes itself. I posted a few more pictures and a bit more about our trip on my non-bag blog Yurtville |
D. CainCyclist and craftsman. 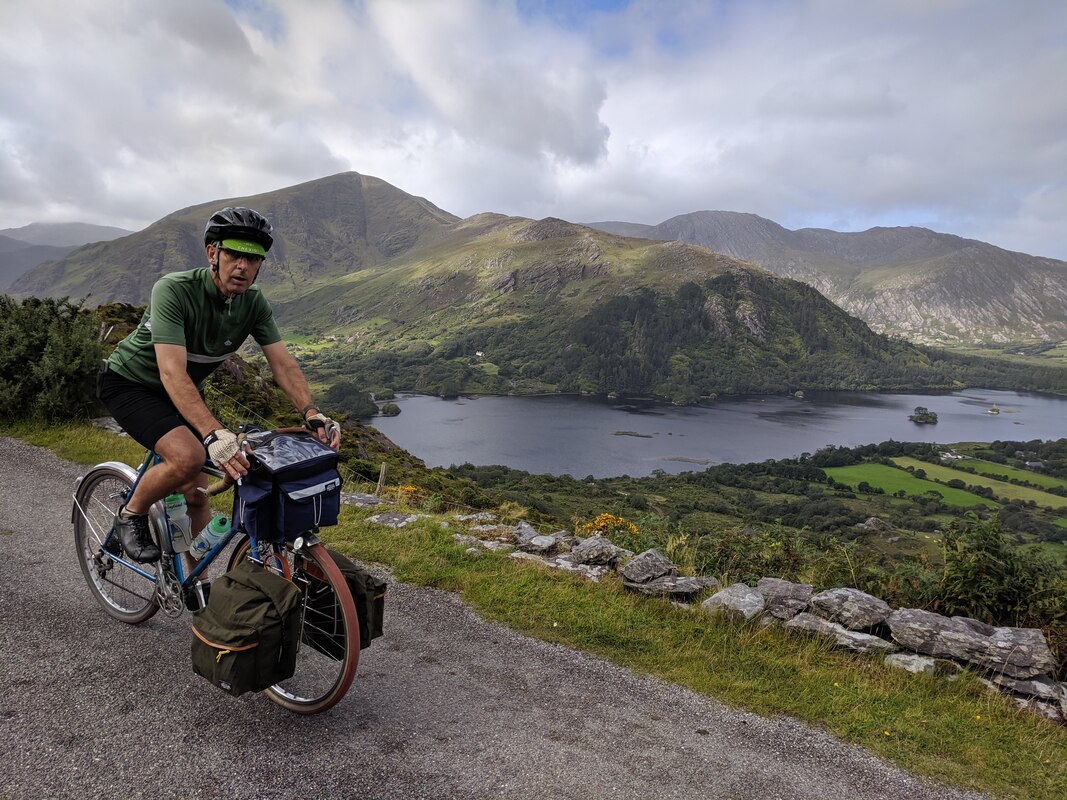
Archives
January 2022
Categories |


 RSS Feed
Copyright © 2023